|
Here is the photo of a slice of Perfect Pecan Pie, as promised. 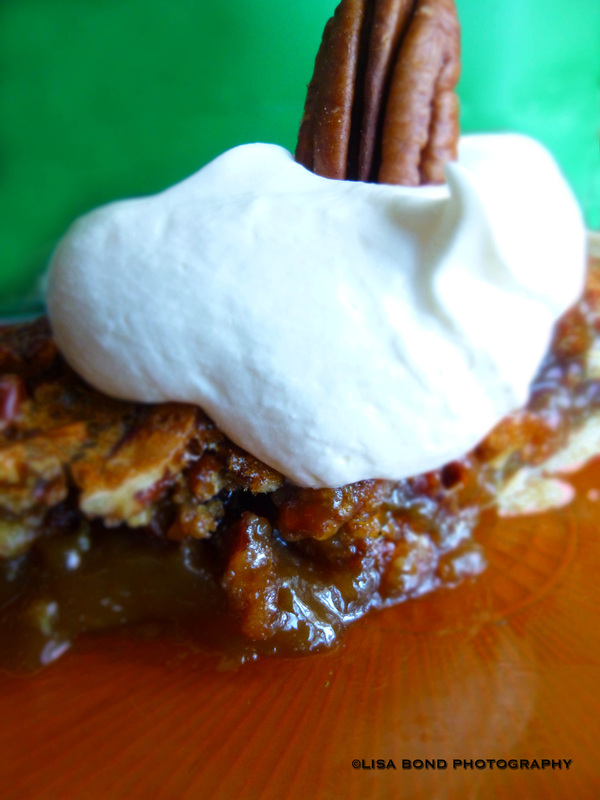
The above photo shows it with one of the extra toasted pecans I talked about in the initial post. 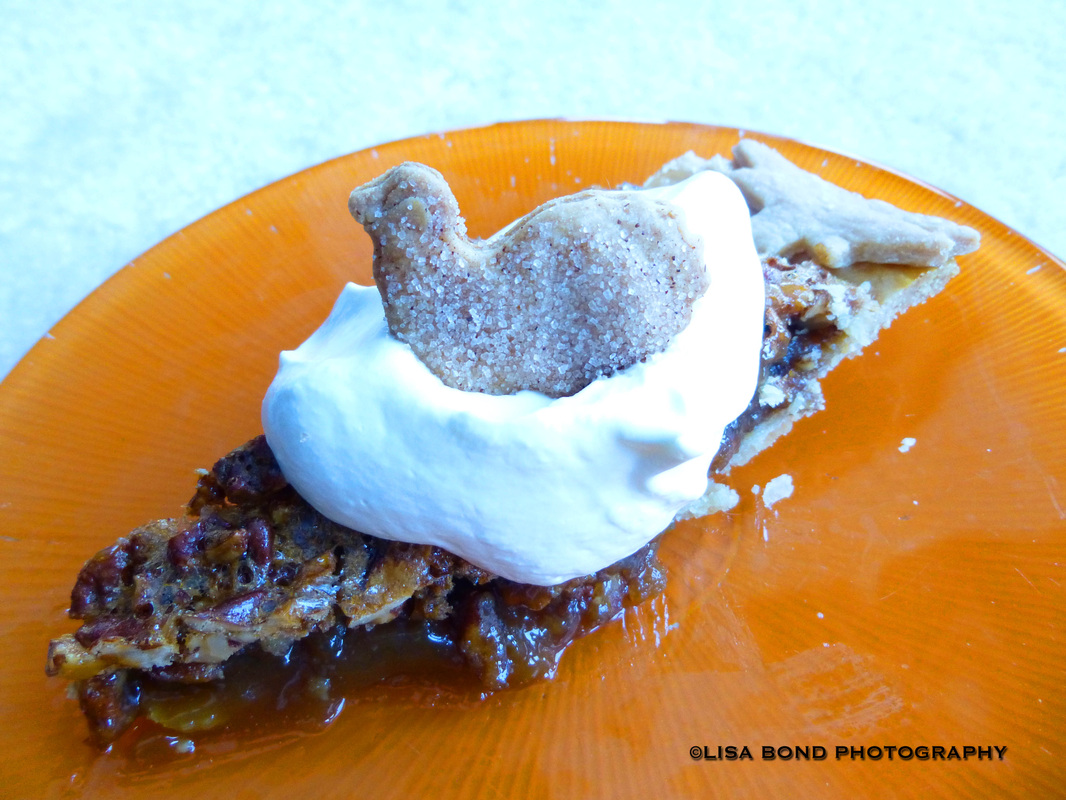
This photo shows it with one of the little pie crust cookies I made, in this case, a turkey. I had no idea it was going to look like a chicken on a nest when I perched it in the cloud of whipped cream, but oh well!
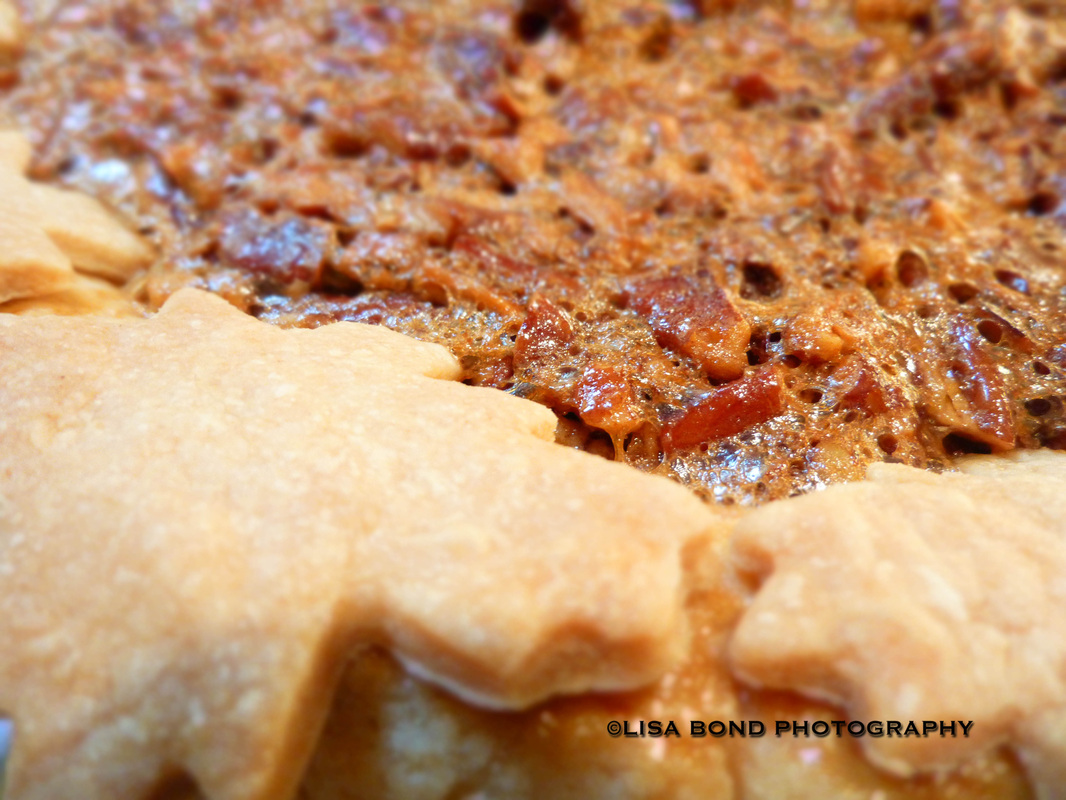
For the record, this is homemade whipped cream, the only kind that will properly do this pie justice. Messing around with Cool Whip or canned whipped cream would be inappropriate with a pie of this caliber. It is worth pointing out that the texture of this pie is a crucial element to its overall success. It is slightly soft but not runny. It is not so firm as to come across as gelatinous which is critical. The filling is opaque and not cloudy as some other pies may appear. The top is crunchy and perfectly balances/counteracts with the softer interior. It is a real winner across all fronts: appearance, texture, and taste. I hope you will give it a try sometime. Thank you for visiting this blog! As promised last week, here is the best Pecan Pie recipe I've ever made. First of all, you need to toast the pecans. I like the Kirkland (Costco) Pecan halves because a 2 lb. bag is only $12.99 and they are nice solid pieces. 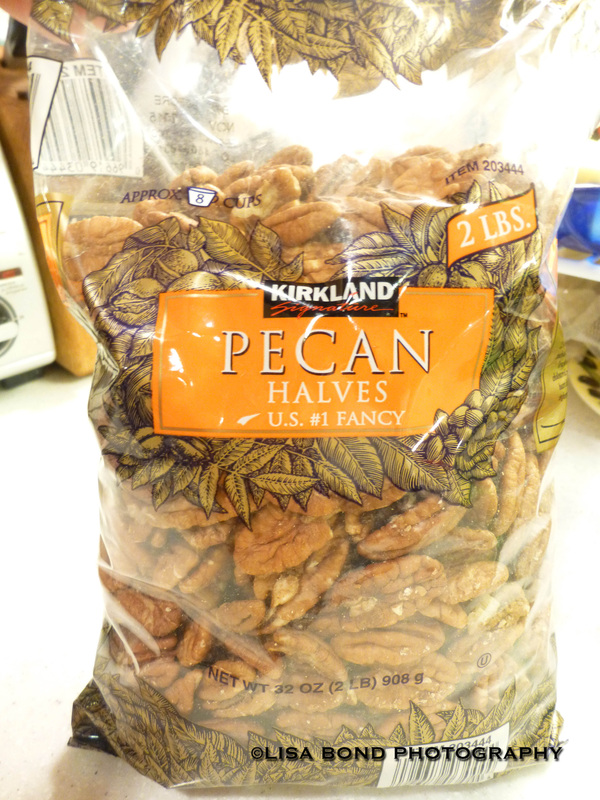
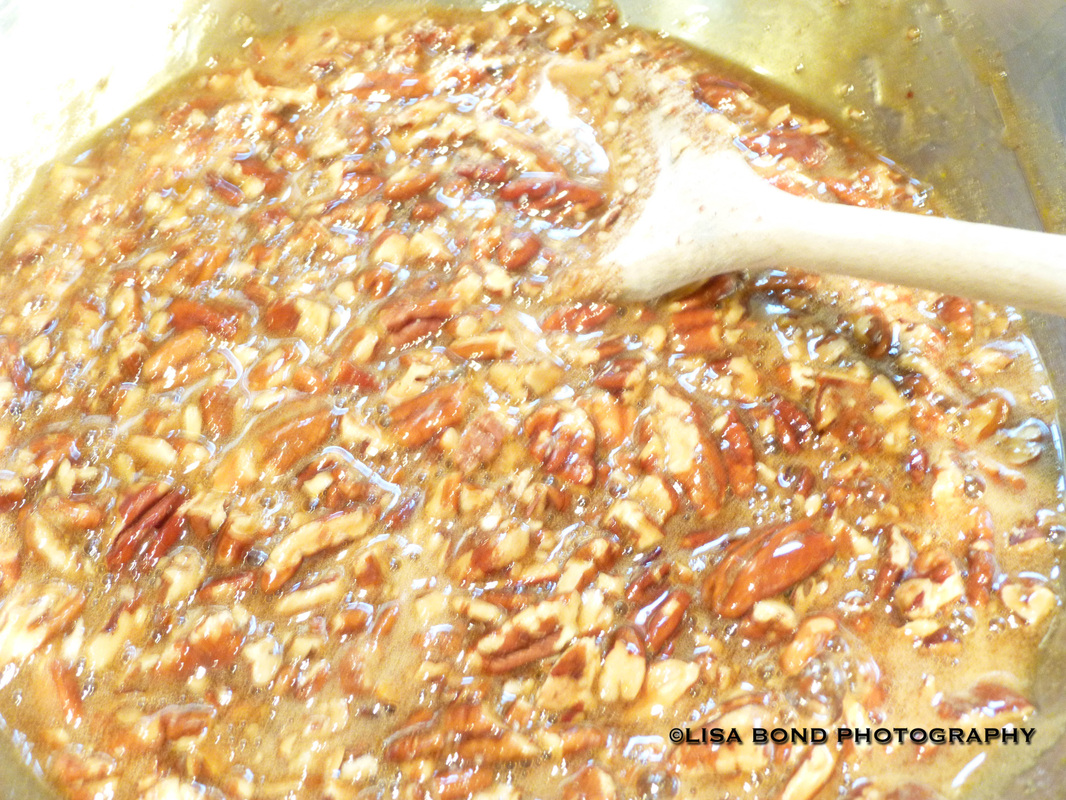
Take the 2 cups of pecans needed for the recipe and spread them on a baking sheet. I added another cup because I always end up eating some and it's nice to have a few extra for decorations, so I'd say I've got 3 cups here. Heat the oven to 350 degrees and bake them for about 12 minutes. Avoid the temptation to leave the kitchen and do something else. I've burned my fair share of pecans because I got distracted elsewhere. Nuts burn fast and there is no bringing them back once they've gone too far. By the 10 minute mark, it's good to be paying close attention to what's going on and give them a stir. Generally speaking, once you can smell the nuts, they are done. 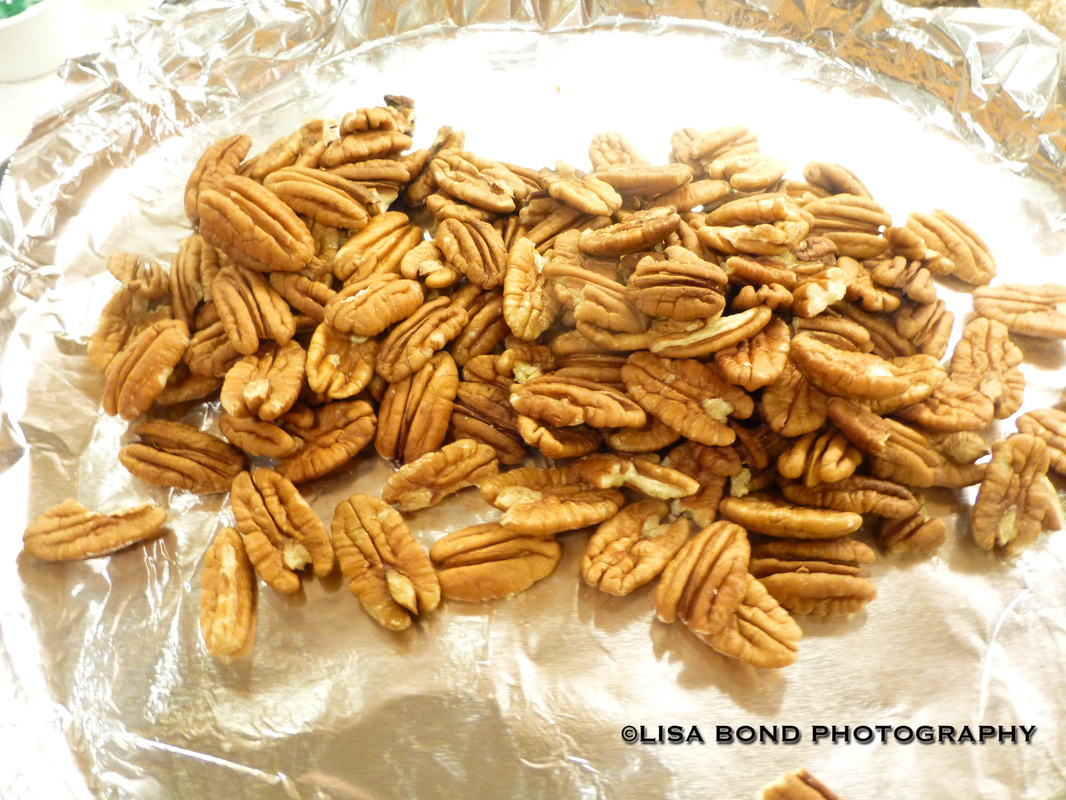
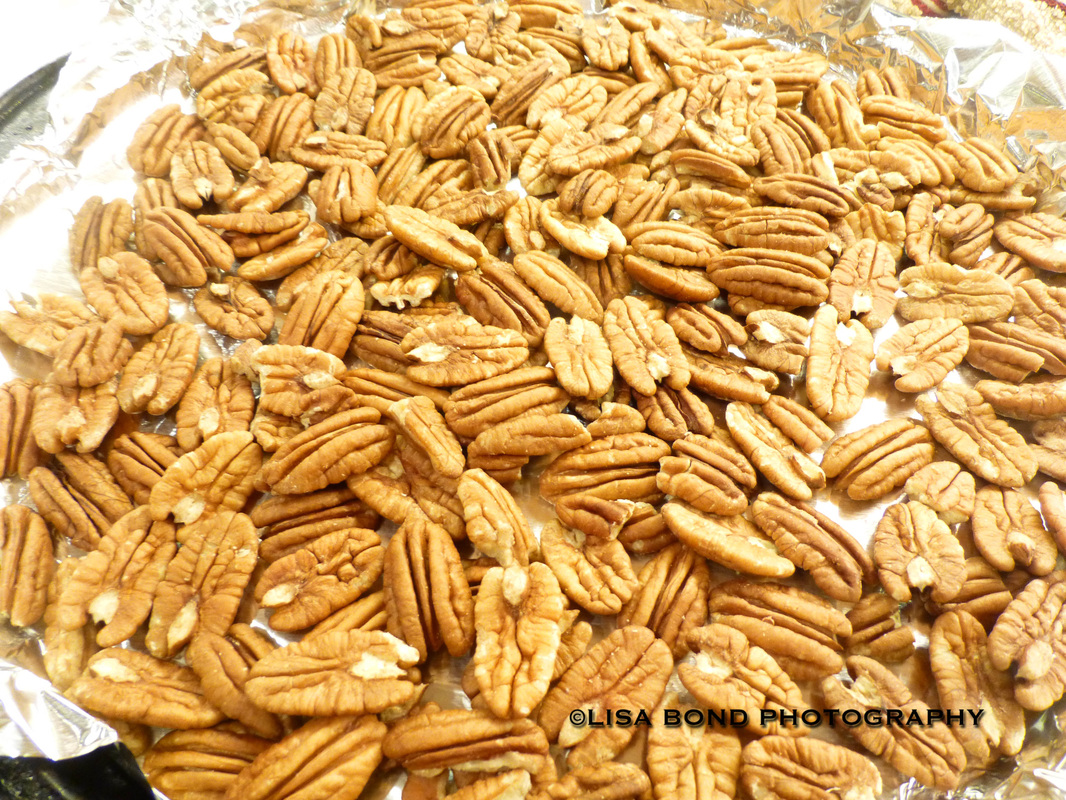
Here are the nuts after they are roasted. 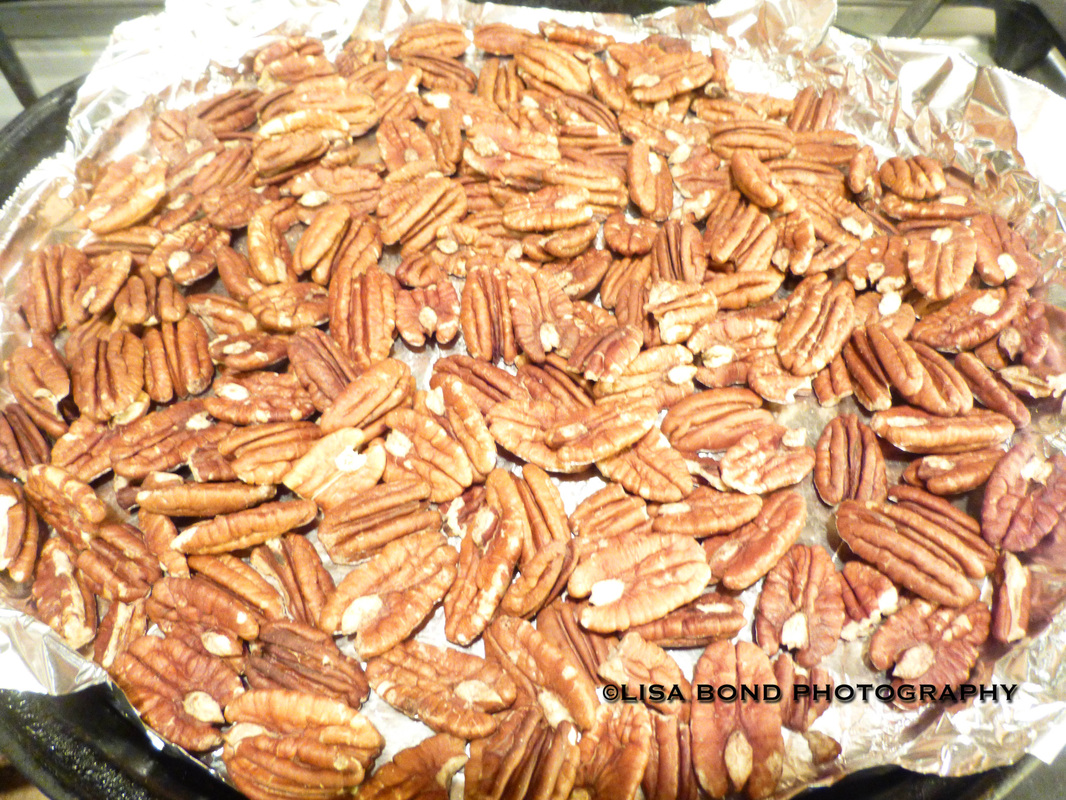
These roasted for exactly 12 minutes and they look good. Only one or two look a bit dark. The nut circled below is too dark. You want to throw out any that are this color. 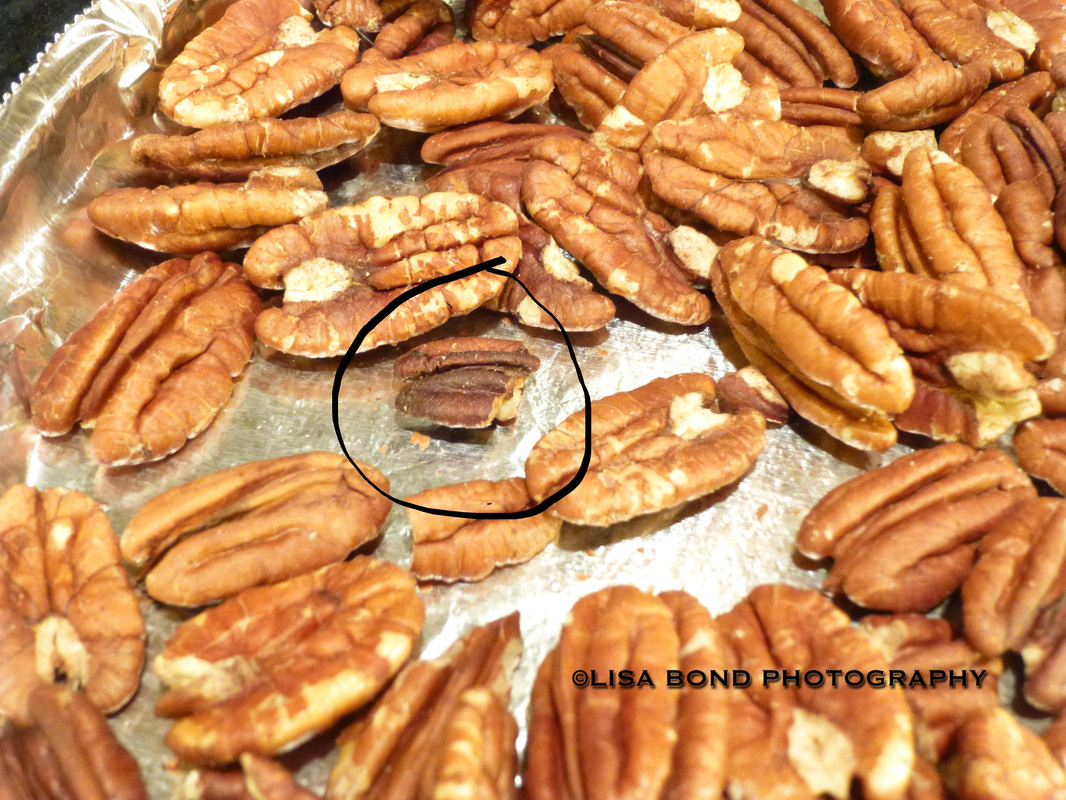
I turn on the exhaust fan to get the smell out of the house quick because of my child with nut allergies. Some years I have put them in the patio if it's not too cold or I try to do it when he isn't in the house. Next, you want to chop them up. I chop mine rather gingerly to avoid having nut fragments flying all over the place on account of my child with allergies. Also, I think the larger pieces are more toothsome than if they were chopped too small. The next thing I do is prepare the pie crust. Use any recipe you like, here is the one I used today: Flaky Pie Crust Bon Appétit | 2000 by Elinor Klivans Makes one 9-inch crust A terrific all-purpose pie crust from Elinor Klivans. Use it during the holiday season and all year long. ingredients
preparationMix flour, sugar and salt in processor. Add butter and shortening. Using on/off turns, process until mixture resembles coarse meal. Drizzle 3 tablespoons ice water over mixture. Process just until moist clumps form, adding more ice water by teaspoonfuls if dough is dry. Gather dough into ball; flatten into disk. Wrap in plastic; chill until dough is firm enough to roll out, about 30 minutes. Roll out dough on lightly floured work surface to 12-inch round. Transfer dough to 9-inch-diameter glass pie dish. Fold overhang under. Crimp edges decoratively. (Can be prepared 2 days ahead. Cover and refrigerate.) Here is the pie crust after it is rolled out. 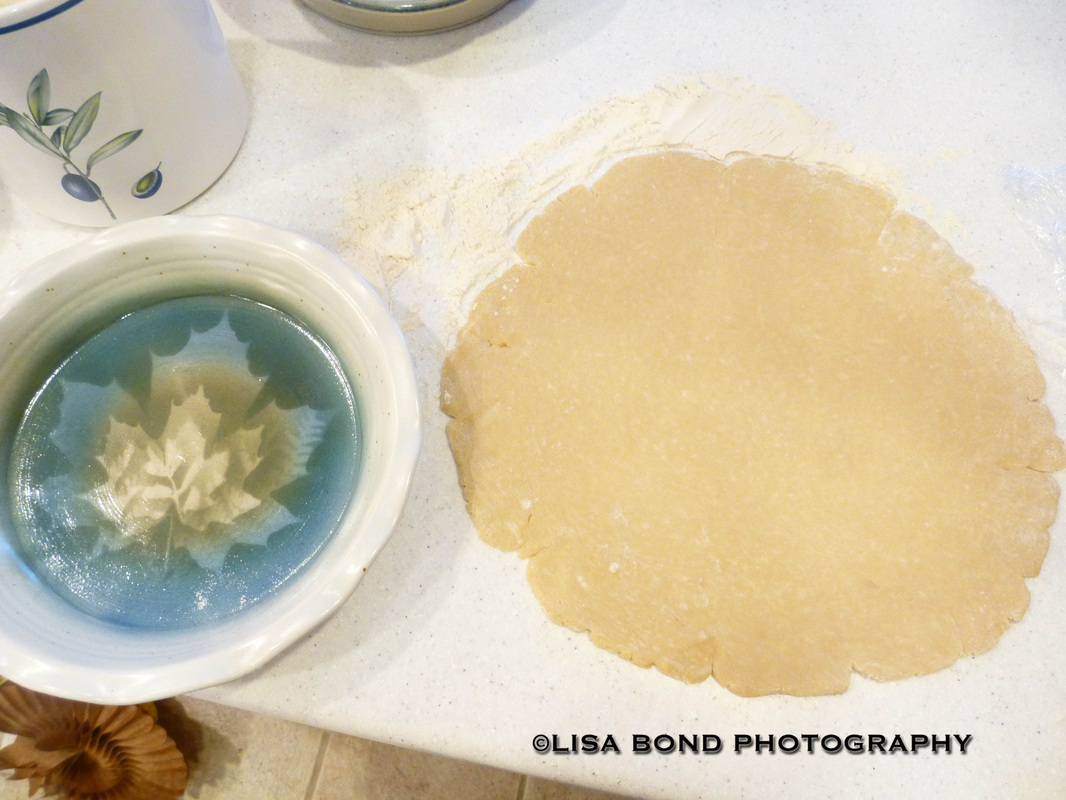
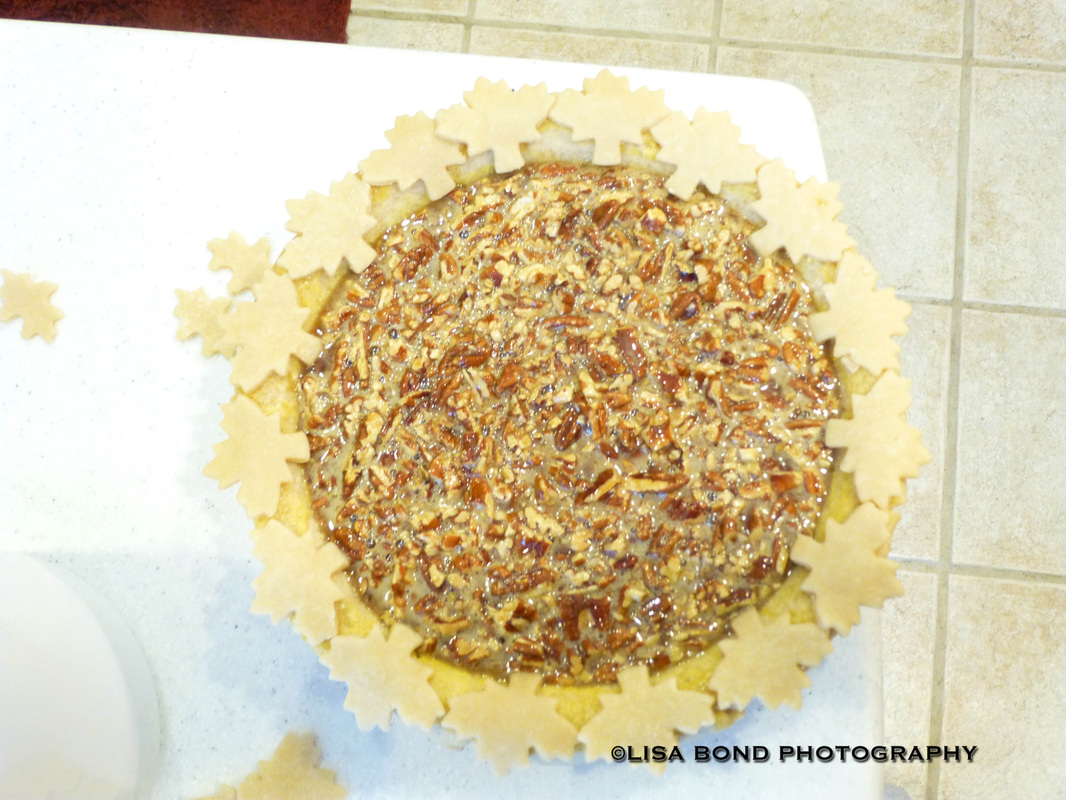
I also like to use festive cookie cutters to cut out little shapes for decoration later. I actually made an extra pie crust to do this. I sprinkle cinnamon sugar on them and bake them for 10 or 15 minutes on a separate cookie sheet. This comes from my Grandma, who used to do exactly that with the pie crust scraps. The kids loved them. 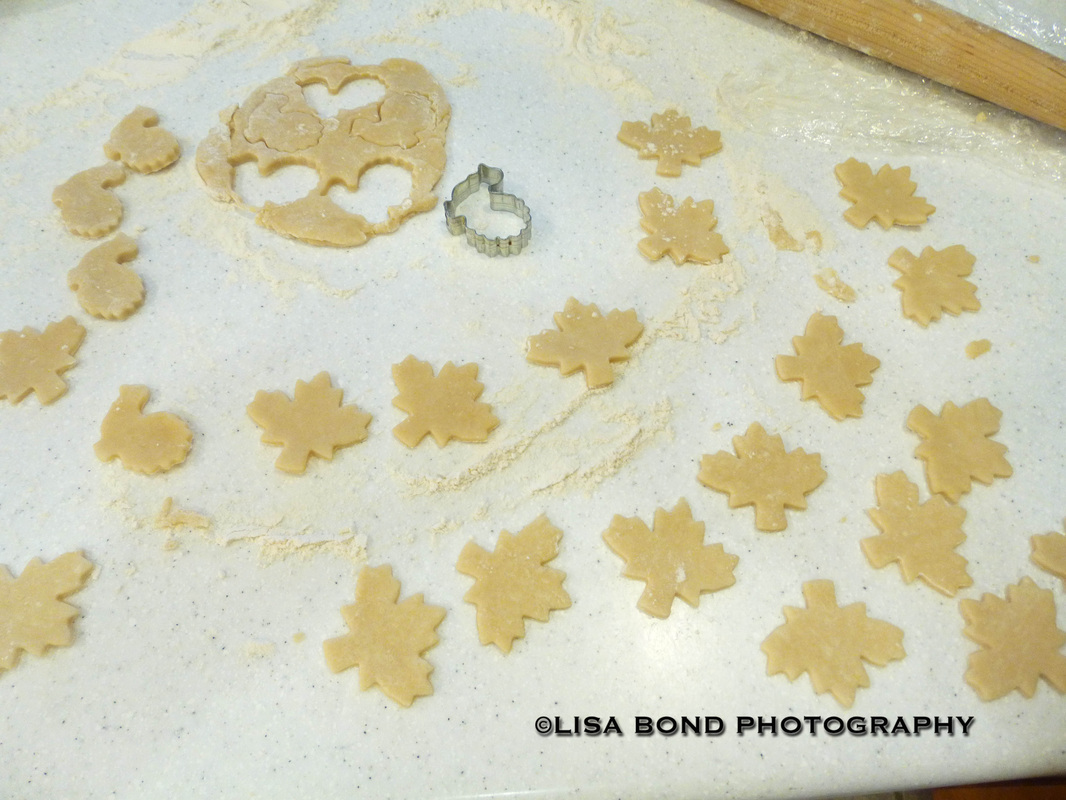
This pie crust needs to be blind baked, so bake it in the oven and use whatever you prefer to keep the crust flat: beans, pie weights, another pie pan, etc. Bake it for 15 minutes at 400 degrees. I am using aluminum foil to keep it flat. I also used a fork to poke holes in through the foil to avoid air bubbles forming. 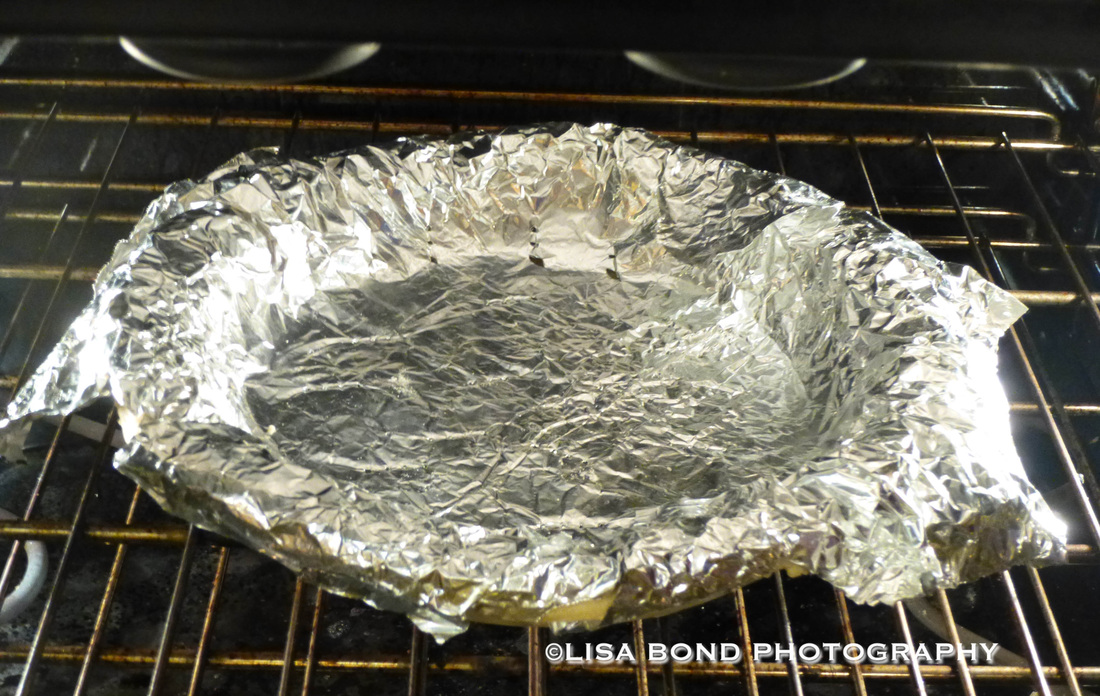
Take off the foil and brush an egg yolk wash in the crust. This should consist of one egg yolk with a tiny bit of water, about 1/8 teaspoon. Bake it for one more minute. I am never happy with how my pie crusts look, but here it is for the record. 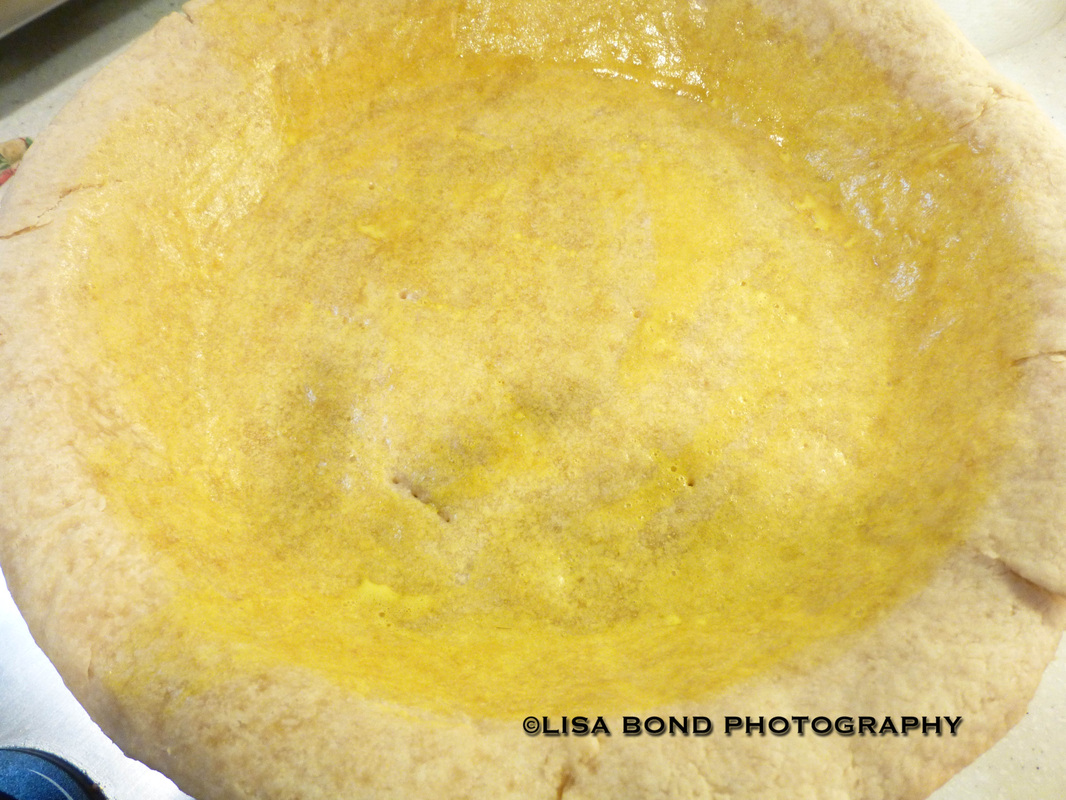
Now I am going to decorate the edges with some of those cookie pie crust leaves I made earlier. 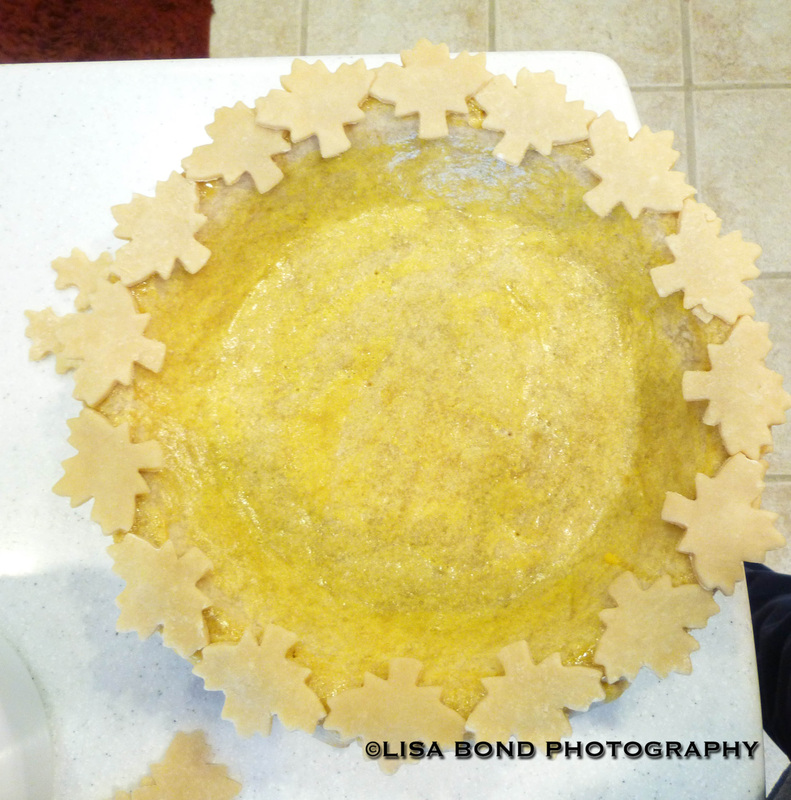
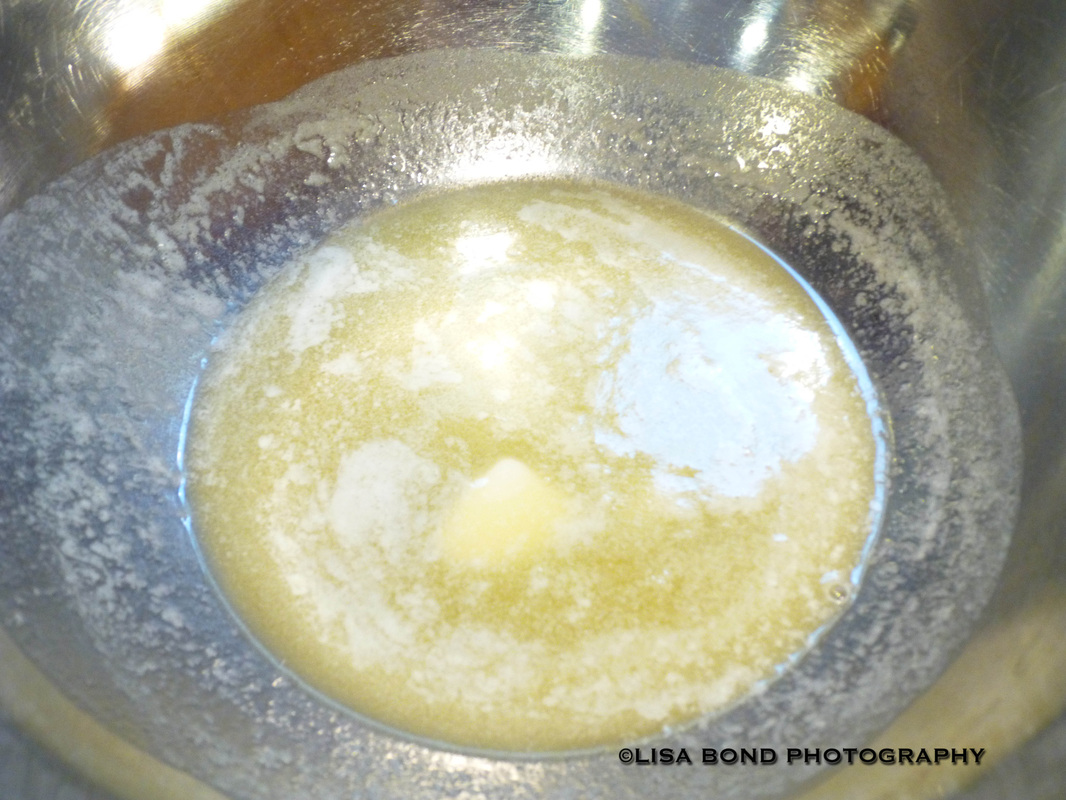
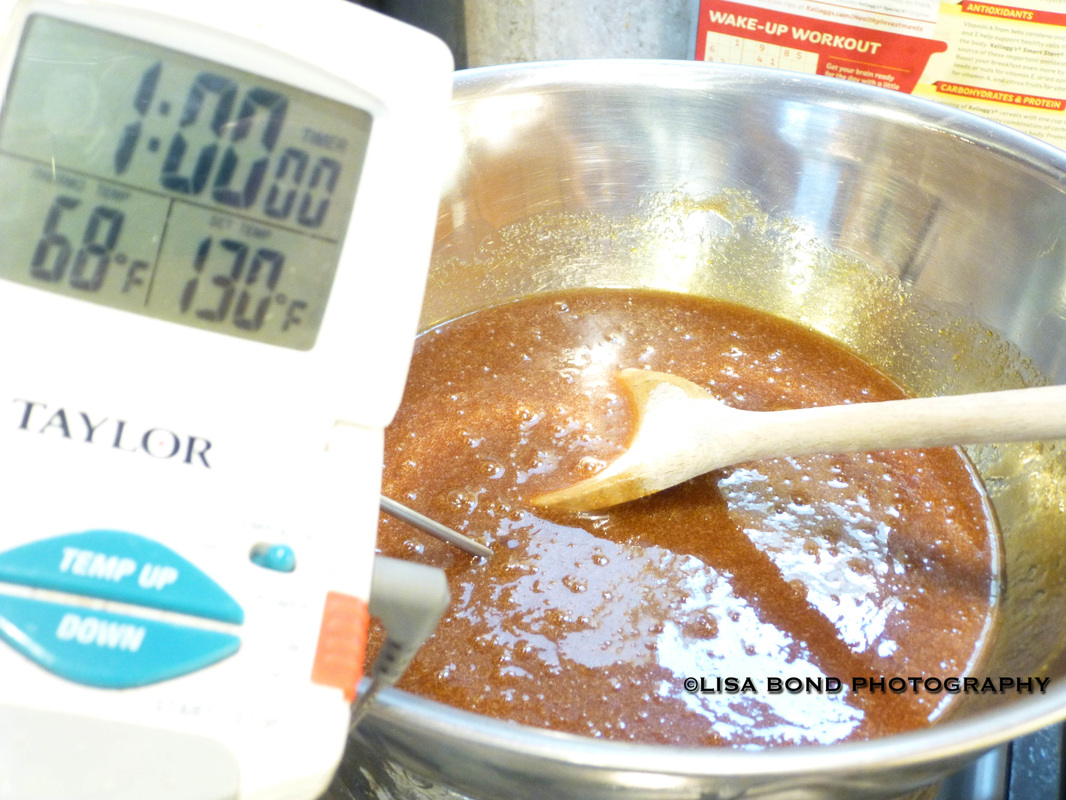
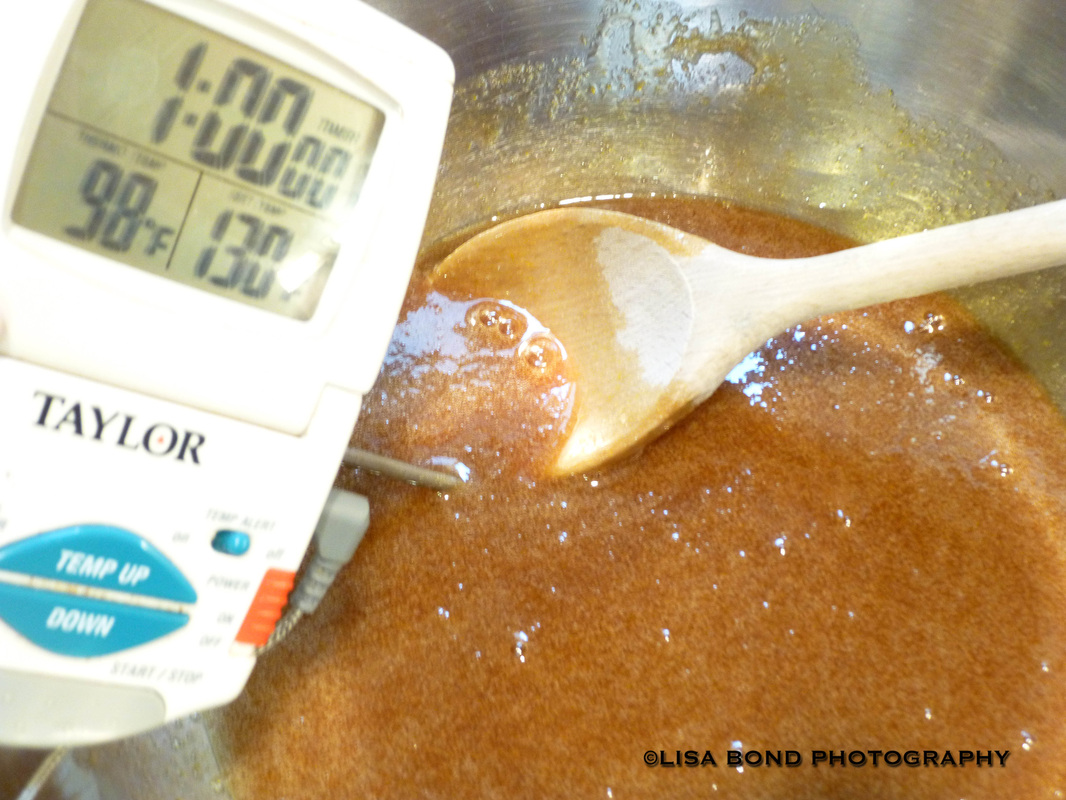
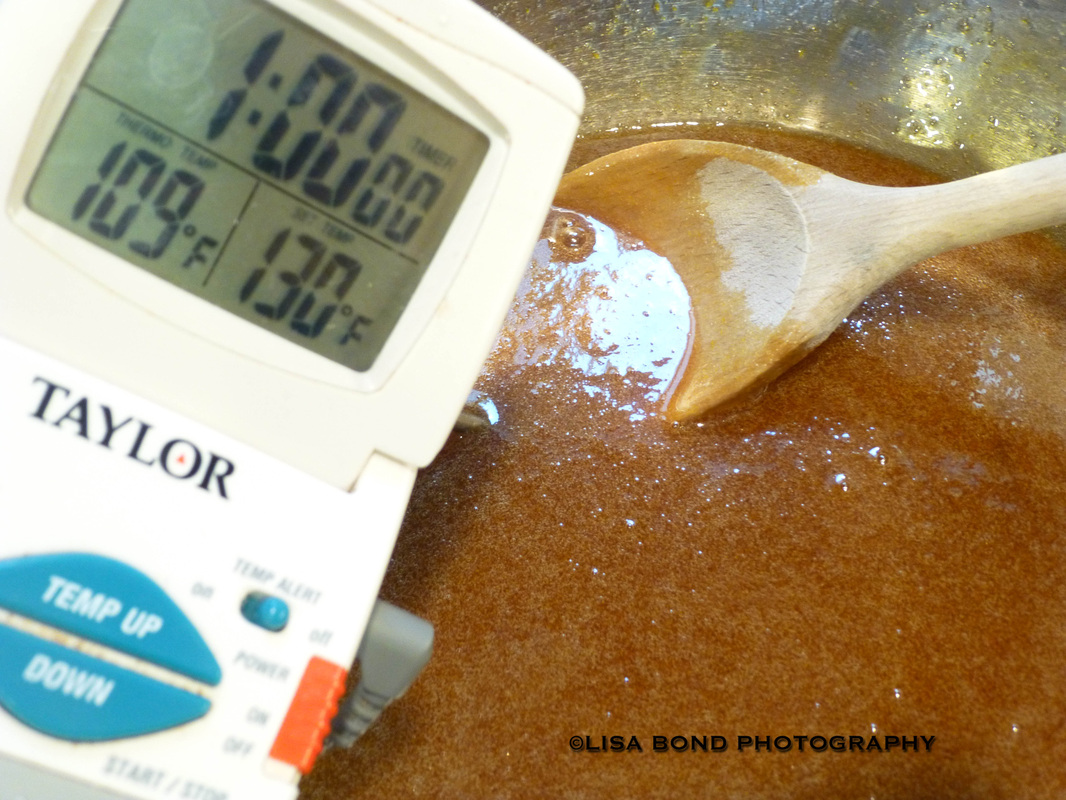
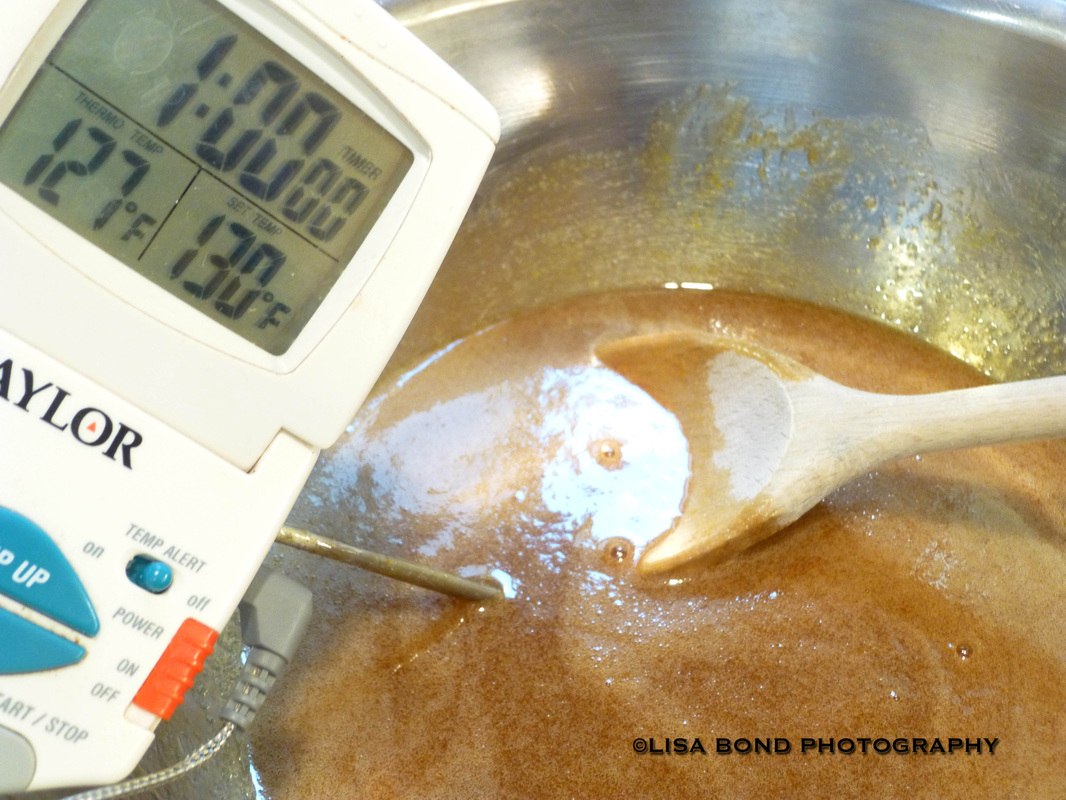
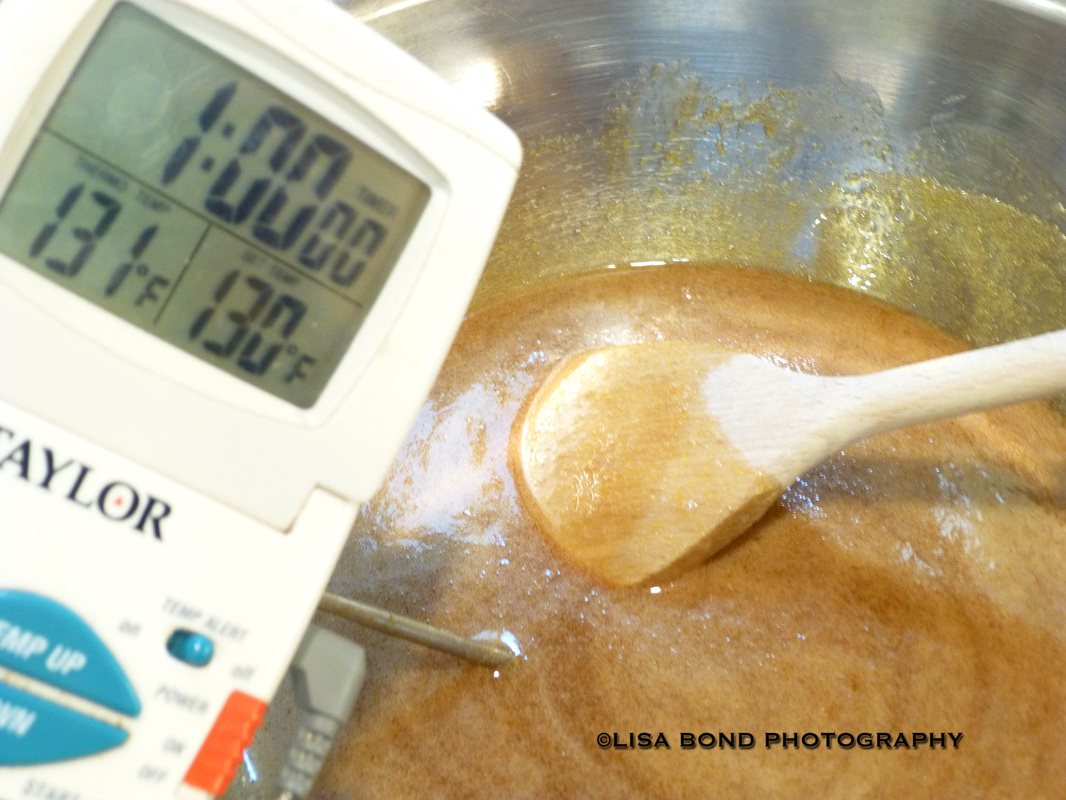
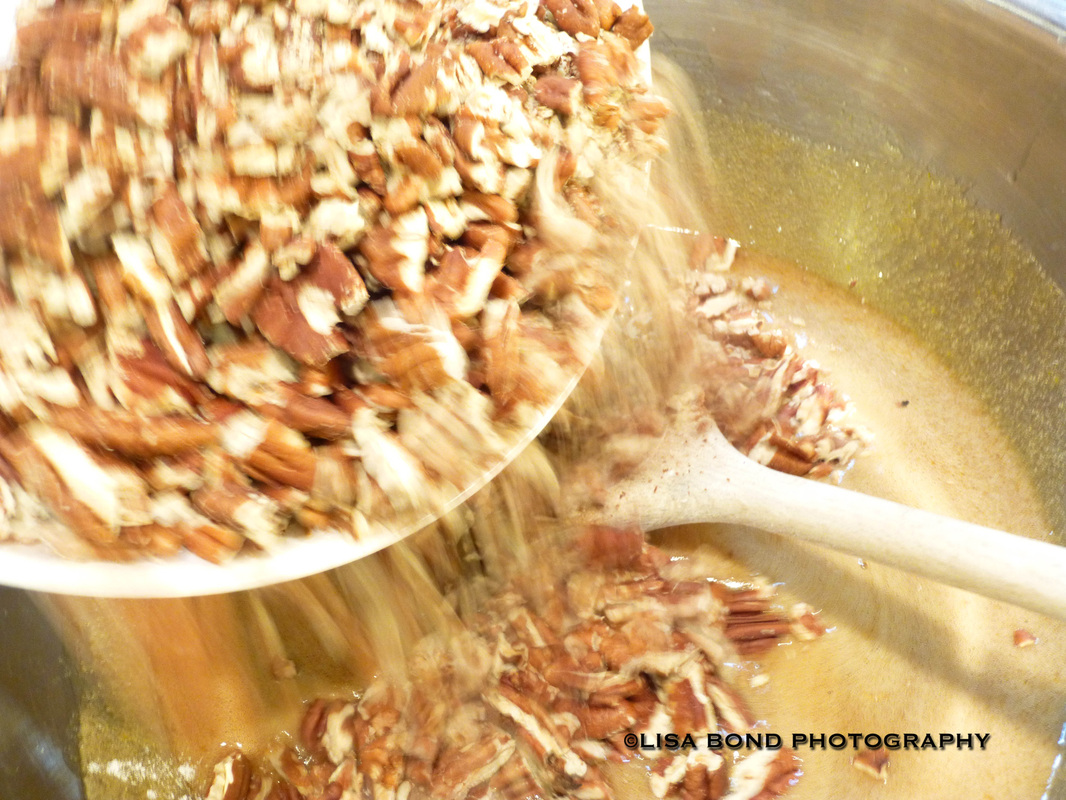
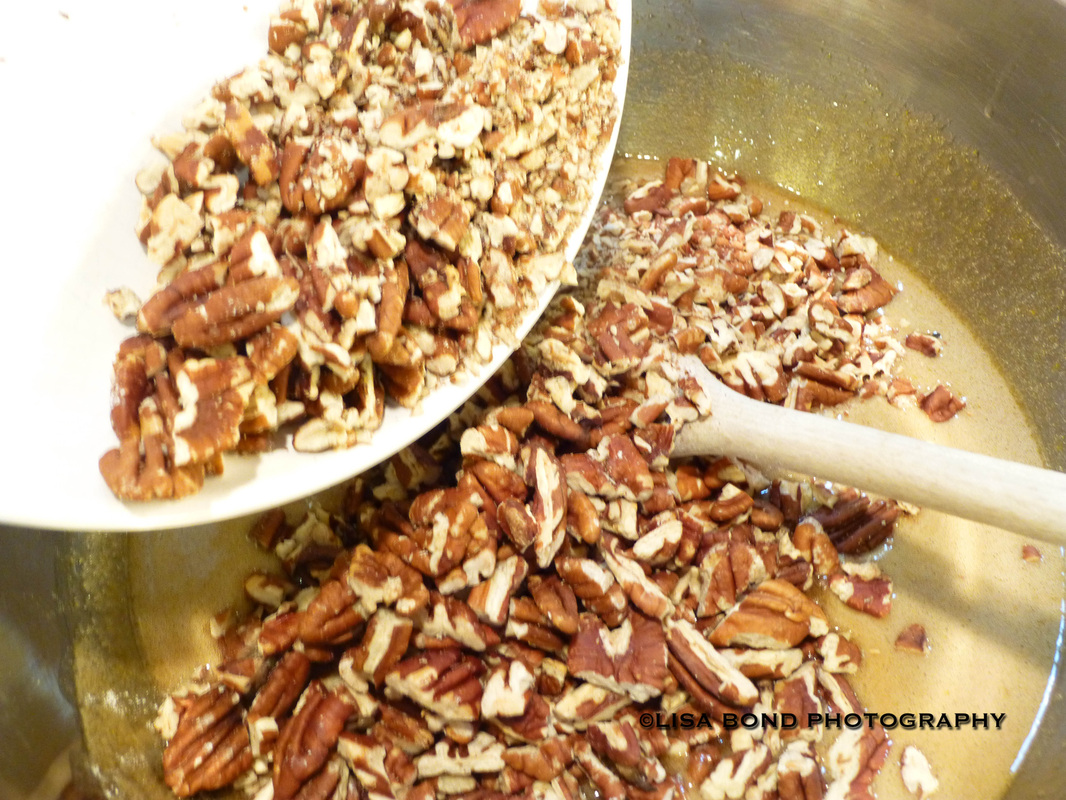
Finally, it is time to make the pie filling. Here is the recipe: Perfect Pecan Pie Serves 8 If you want warm pie, cool the pie thoroughly, then cut and warm it in a 250-degree oven for about 20 minutes. 1 9-inch baked pie shell 6 T. unsalted butter, cut into 1 inch pieces 1 cup packed dark brown sugar 1/2 teaspoon salt 3 large eggs 3/4 cup light corn syrup 1 T. vanilla extract 2 C. pecans (8 ounces), toasted and chopped into small pieces 1. Adjust oven rack to center position, and heat oven to 275 degrees. Place pie shell in oven if not already warm. 2. Melt butter in medium heatproof bowl set in skillet of water maintained at just below simmer. Remove bowl from skillet; mix in sugar and salt with wooden spoon until butter is absorbed. Beat in eggs, then corn syrup and vanilla. Return bowl to hot water; stir until mixture is shiny and warm to the touch, about 130 degrees. Remove from heat; stir in pecans. 3. Pour mixture into warm shell; bake until center feels set yet soft, like gelatin, when gently pressed, 50 to 60 minutes. Transfer pie to rack; let cool completely, at least 4 hours. Serve pie at room temperature or warm, with lightly sweetened whipped cream or vanilla ice cream. Cook's Illustrated, November/December 1995 Here is the recipe, step-by-step, with photos. First of all, mise en place. Assembling the ingredients now will help with baking later. 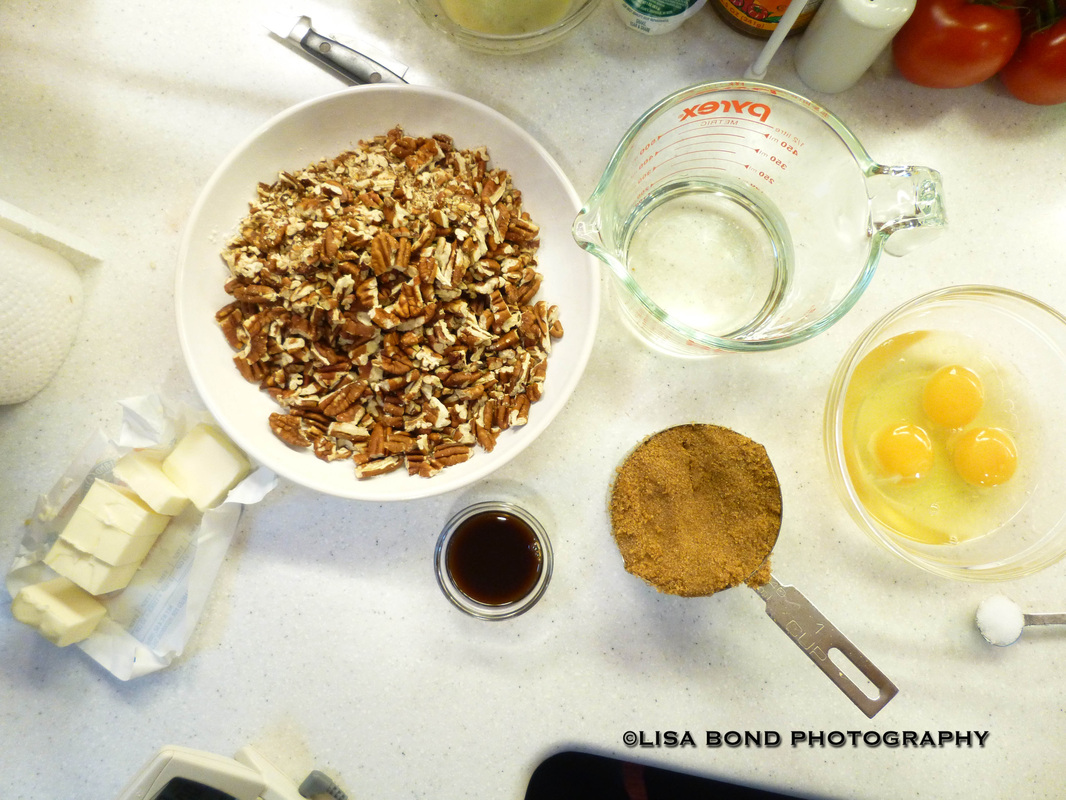
Melt butter in medium heatproof bowl set in skillet of water maintained at just below simmer. 
Remove bowl from skillet; mix in sugar and salt with wooden spoon until butter is absorbed. 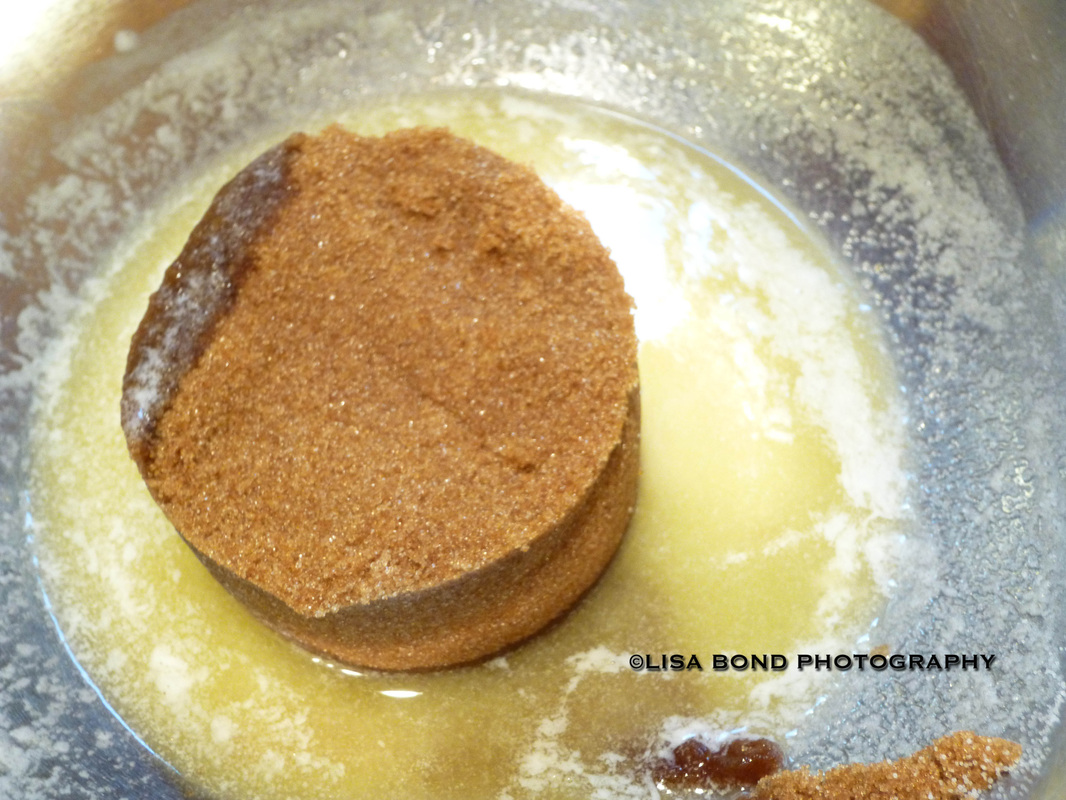
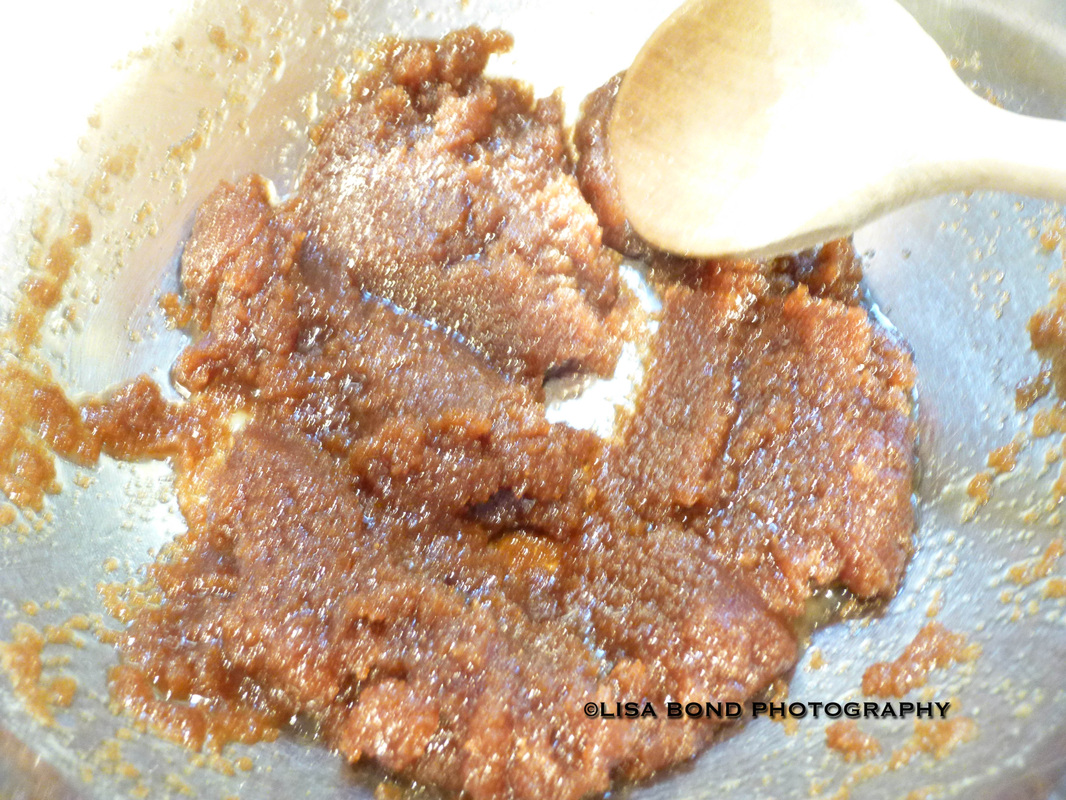
Beat in eggs, then corn syrup and vanilla. 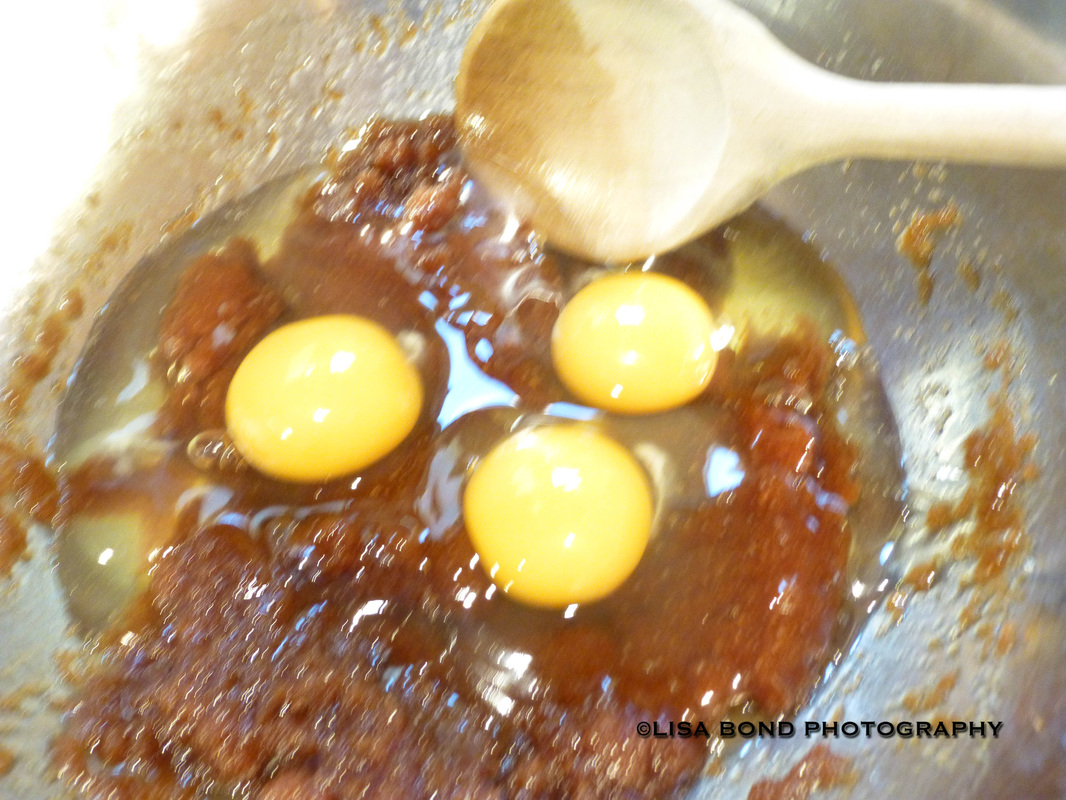
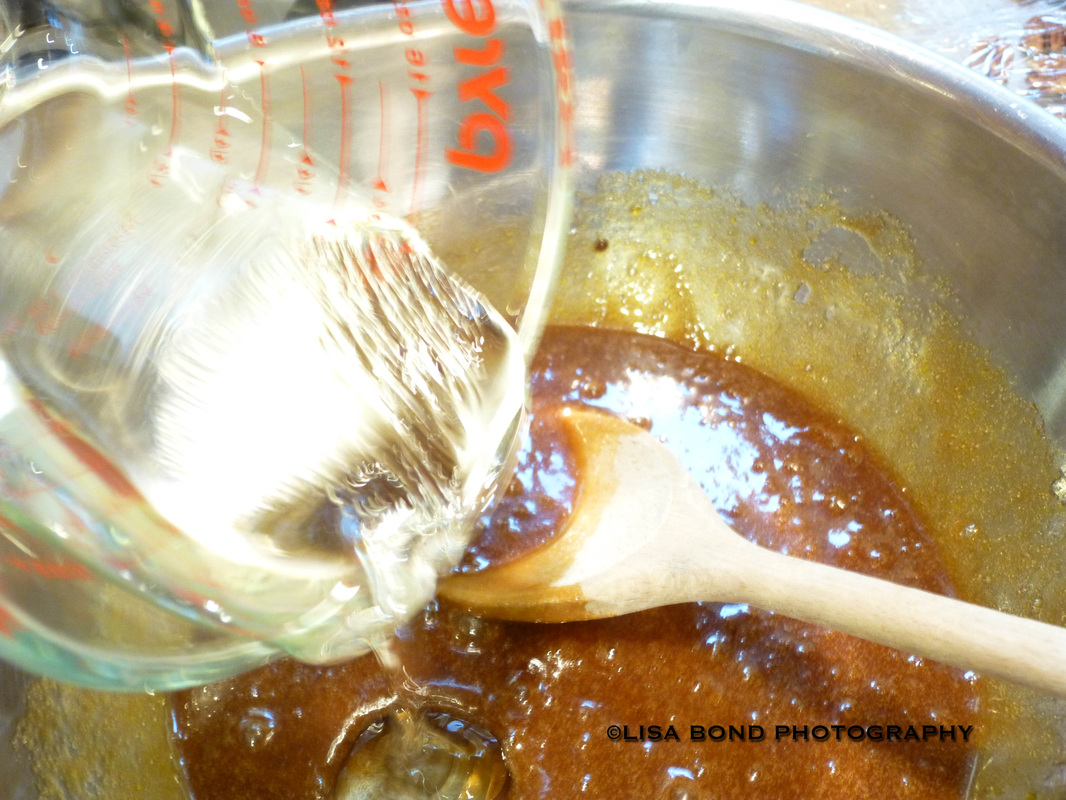
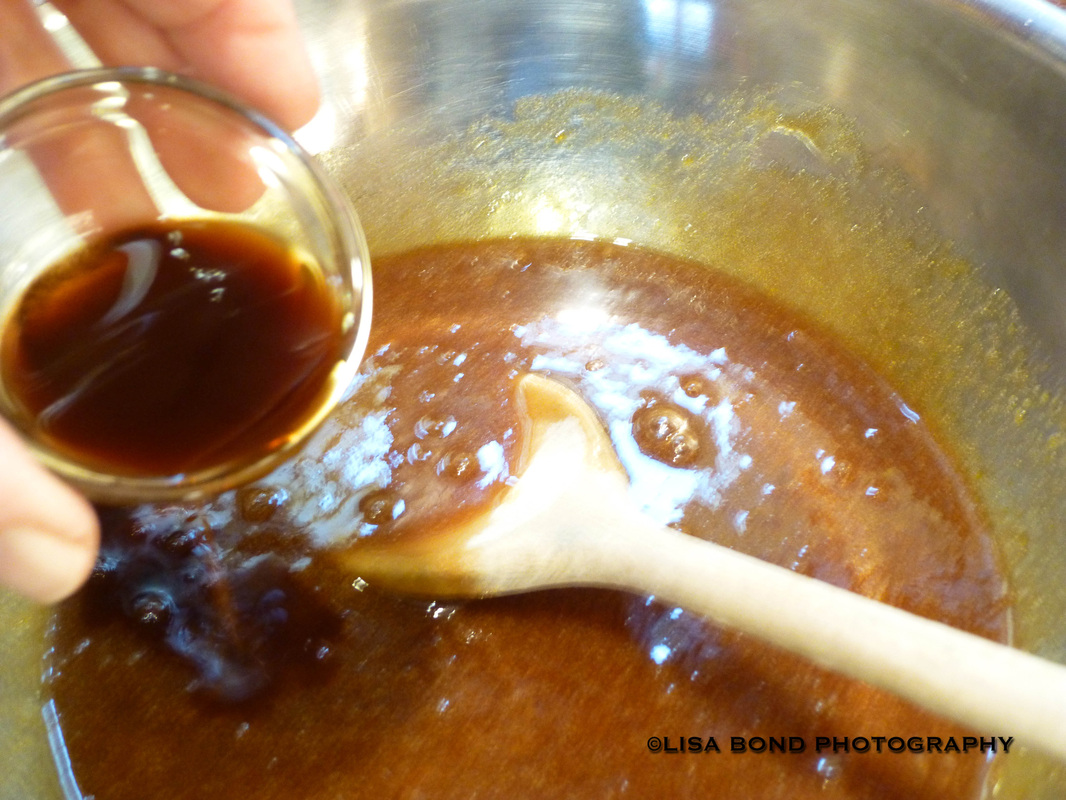
Return bowl to hot water; stir until mixture is shiny and warm to the touch, about 130 degrees. Remove from heat; stir in pecans. Pour mixture into warm shell; bake until center feels set yet soft, like gelatin, when gently pressed, 50 to 60 minutes. 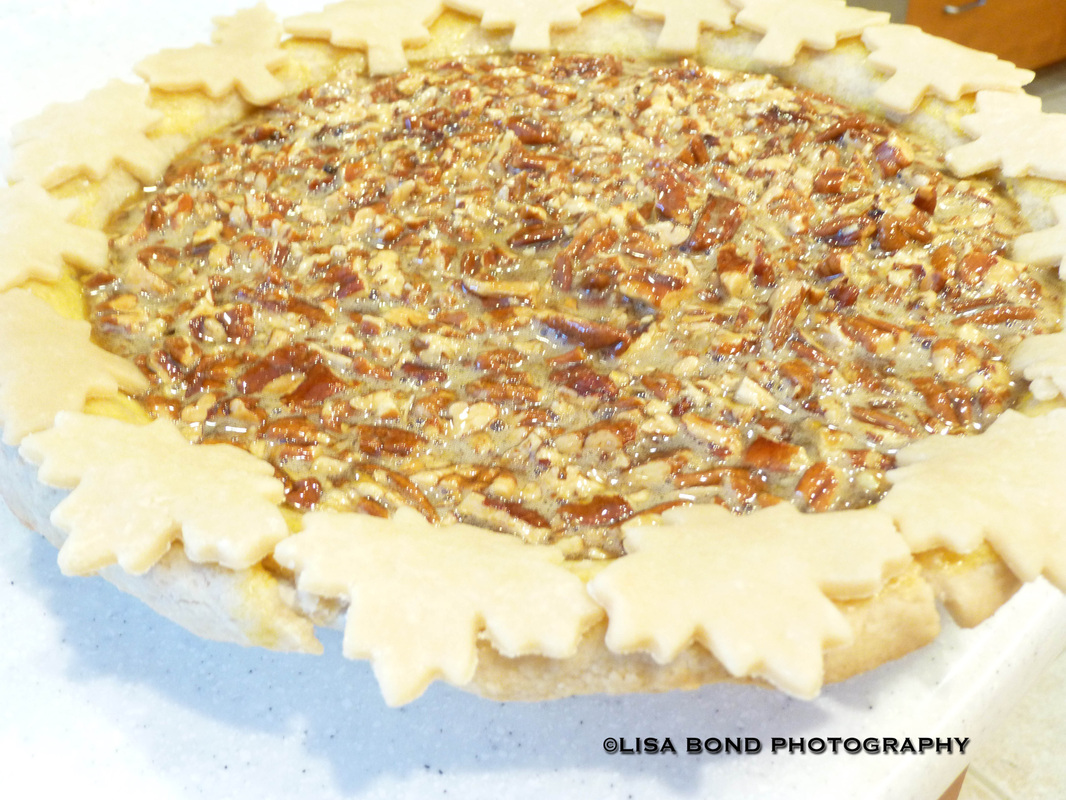
I had to bake this pie a bit longer for some reason. I don't remember doing it in year's past, but go with the appearance and make sure the filling isn't sloshing around when the time is up. If it is, bake a little longer. Here is the finished pie. I will take a picture of it tomorrow after I cut a piece and post it for you. 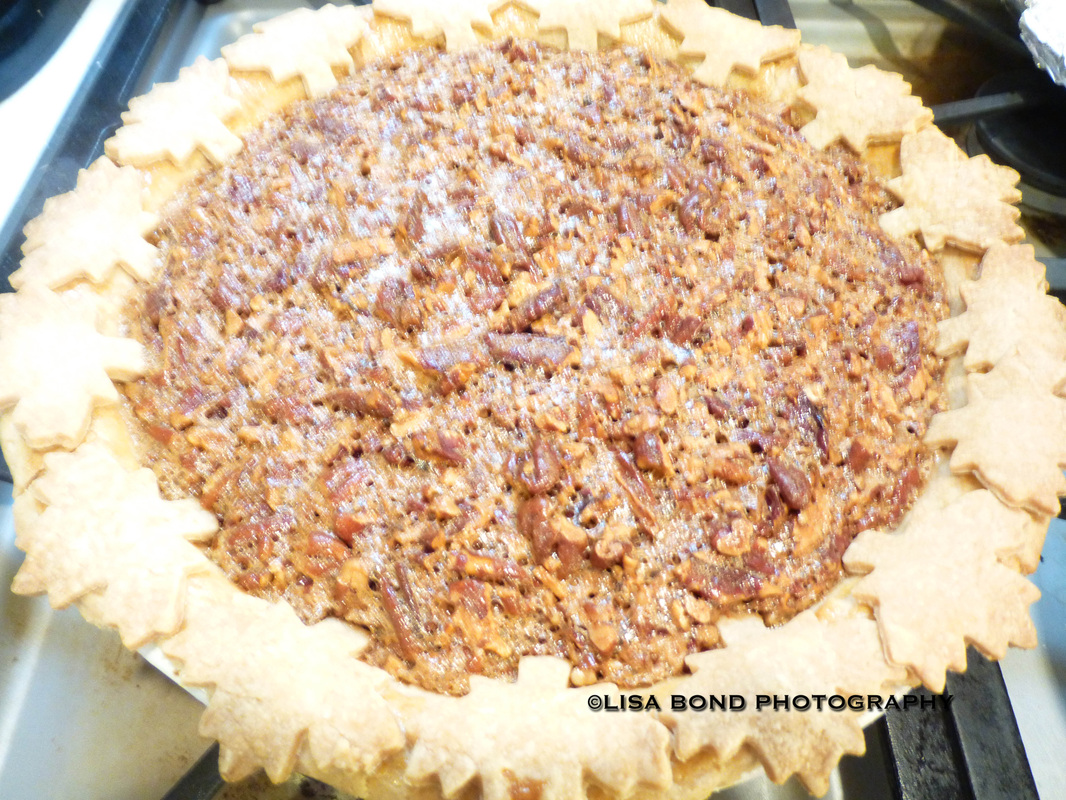
Happy Thanksgiving to you all and thank you for stopping by!
Big plans were underway for this Thanksgiving post. I was about to share a recipe and photos on how to make a very excellent pecan pie. I am not quite ready to make it though, as Thanksgiving is about a week away. I will make it next Wednesday and I'll try to post right afterward. If you want to bake this pie, get
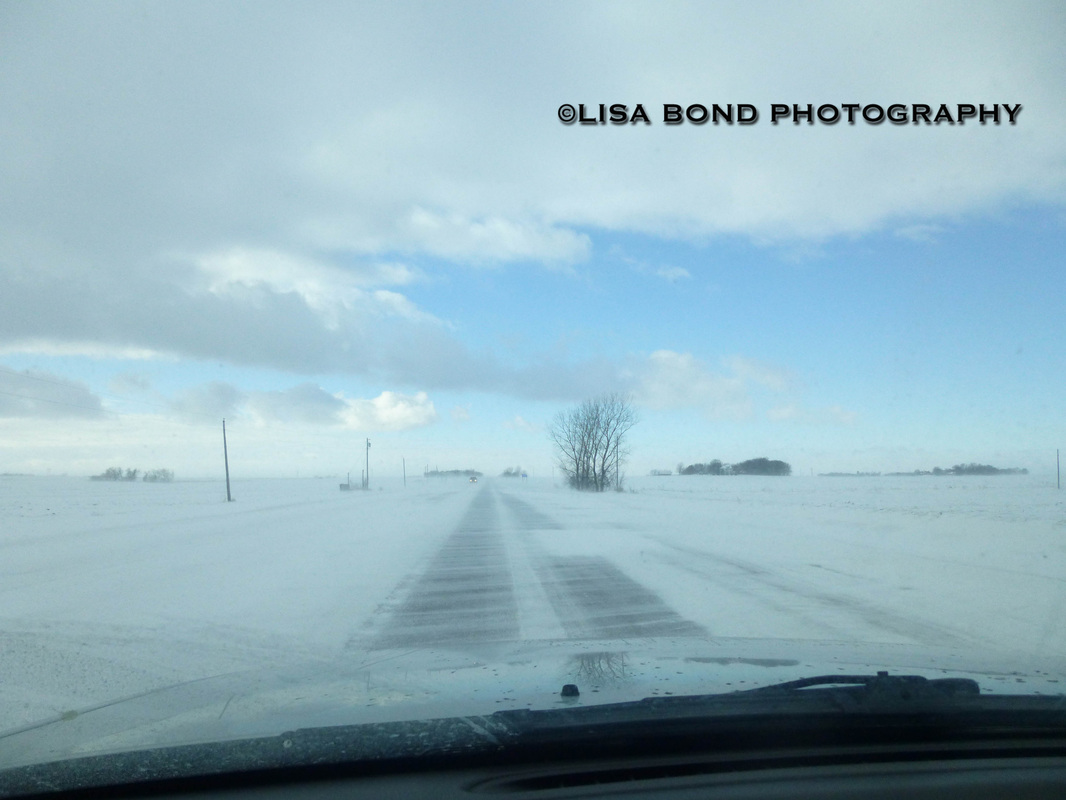
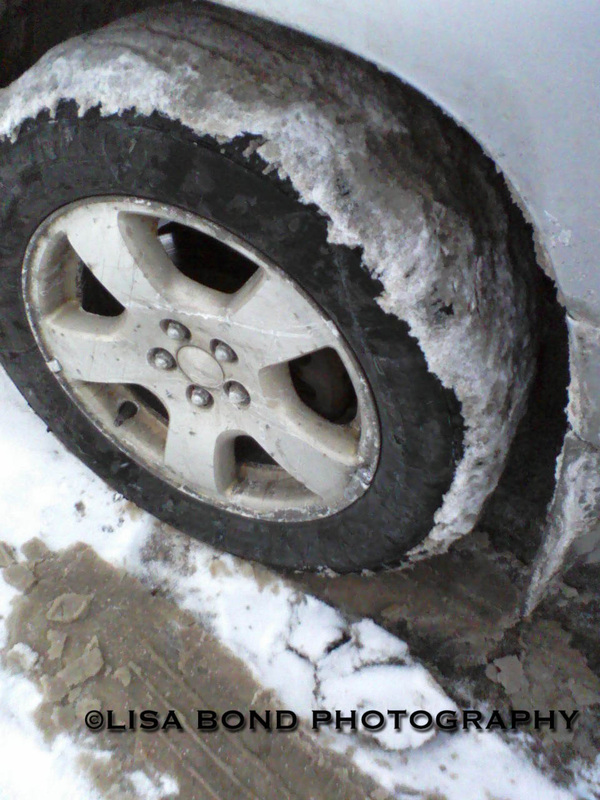
If you are a fan of pecan pie, you won't want to miss this recipe. I've tried my fair share of pecan pies and I have to say this one is worth making and probably better than any you can buy. You will love it and so will everyone else who tries it. In the meantime, my daughter has started playing ice hockey and about 30% of my life now revolves around hockey and hockey rinks, so I have a little less time on my hands. In fact, I am preparing to head out of town for a hockey tournament this weekend. As such, I am going to put a link to last year's Thanksgiving related post concerning Cranberry Daiquiris as it was a popular one. I'll be back with that pecan pie recipe soon! http://www.lisabondphotography.com/blog/thanksgiving-refreshments-a-cranberry-daiquiri Hello potential Minnesota tourists! Now that we've had our first significant snowfall of the season, it is safe to officially declare the beginning of winter. As such, there might be a traveler or two out there who has Minnesota on their upcoming agenda and might be thinking, "I wonder what the driving is going to be like there?" Wonder no more. This blog will present you with the photos and a few well-chosen words to sum up driving during the four seasons. First off, let's set the record straight. There are actually only two seasons in Minnesota: winter and summer. Fall only lasts for a few weeks and we like to call it Indian Summer around here, as it occurs sometime in September or early October, long before any leaves have dropped and the pools probably still have water in them. Yes, we really do have pools. Every Minnesotan either has a lake or a pool. It's one of our residential rights. Then we play hockey or skate on them in the winter. The last few years, it's been snowing in April and May, therefore, so much for Spring. The mosquitos will be biting by the time the snow melts. That means it's officially summer. Now for those pictures I promised. Here's what you can expect driving in Minnesota in the Summer: As soon as the last barrel is picked up, the snow starts flying. Here's what you can expect in the Winter: Since you might be coming in Winter, it's helpful to know about "White Knuckle" steering. To keep with the times and at least appear hip, let's hereinafter refer to it as WK. It's a simple procedure, you'll be able to learn it quickly and it will come in handy right out of the rental car parking lot. First of all, put your hands in the proper 10 and 2:00 position. Never mind what your teen's driving instructor (the paid one) is telling them about 8 and 4:00. You won't be able to achieve a proper WK doing that. Get your hands at 10-and-2. Now grip the steering wheel as tight and hard as you can, until your knuckles start to turn white. It might take awhile for them to turn white, just keep hanging on. There you go, now you've got it. The reality is, you won't have to practice WK much at all. Once the car starts sliding out of control (what we in Minnesota like to affectionately refer to as "fish-tailing" and it's not something that happens in a boat) WK is an auto-reflex and your hands will immediately know what to do. It doesn't really help steer the car any better, but you will feel more in control knowing that you are hanging on as tight as you can. If you see a patch of ice, do not, I repeat, do not hit the brakes. Engage the WK and start praying out loud as you "glide" across the ice. Taking several deep breaths or breathing rapidly, whatever works for you, might help too. When you come out the other side of it, a small celebration will be in order. Well, there you go. That's about everything you'll need to know about driving here. If you come in the summer, the driving will go as slow as it does in the winter, oh I'd say around 10 mph, 20 if you're lucky on account of all the cones and barrels and lane closures. There's a lot of road repair to be done here after the snowplowing and pot-hole formations (to be explained in a future blog). The road crews do not waste a second getting right to work on fixing the winter damage and coming up with new projects. The roads need to be rebuilt regularly after what they go through every year. You'll have plenty of time to find your way around going at that speed. There might be some horns blaring and fingers flying. Don't be fooled by "Minnesota Nice" and misinterpret it for waving when you are driving. We are one of the top states for Road Rage incidents, particularly in the summer. You can probably see why just looking at the pictures. There is much less road rage in the winter, probably on account of the WK we're all doing. It's best to ignore it and fast forward to the end of the blog. The moral of the story is: leave more time than you think to get there. Double or triple the time it would take you to drive that distance in most other places. If Mapquest tells you 20 minutes, make it 60. You will impress everyone by being on time to your destination. Don't tell 'em you heard it from the Queen of IML8. And on a final note, after all that driving, you deserve to relax. You're likely to see one of these along your route or many other alternatives. We have A LOT of liquor stores here, not like some other states. Pull an immediate right or left and take care of business. You'll thank me later!  In this part of the country, food trucks have become all the rage. They are mobile dining experiences and travel around to different locations throughout the week. I've tried them twice before. The first time was when I read about a Lobster Roll truck, and trying/hoping to recreate a Lobster Roll experience I had at Red's in Maine, I went down there. It wasn't bad, but it wasn't Red's. Well, this is Minnesota after all and while we do have a lot of lakes, there aren't any lobsters in them. Perhaps my expectations were a bit high. The second time I tried one was at my favorite outdoor market, the Mill City Farmer's Market. This truck was run by Chef Shack. They create a lot of great food and one of their menu staples is the mini donut. It'll set you back $7, but they truly were some of the best and most memorable mini donuts I've ever had. 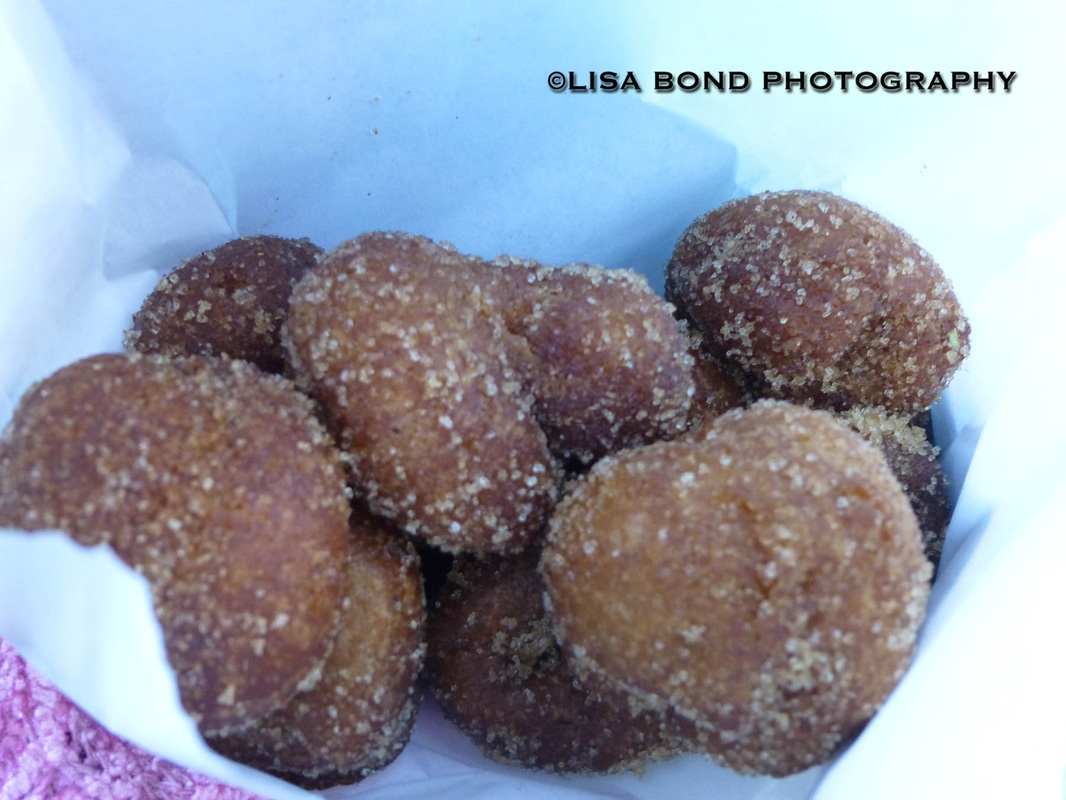
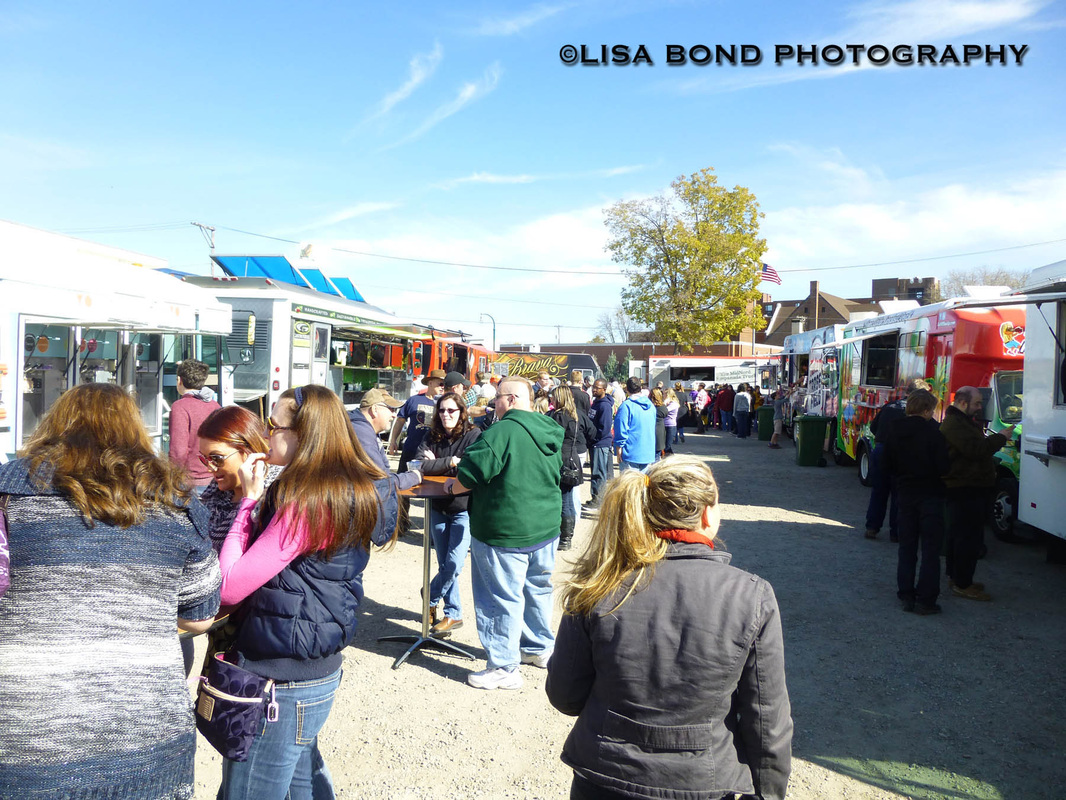
I've heard about purported mass gatherings of food trucks here and there, but always forget to go...until last weekend. I made it to an event that had 18 trucks in one spot. 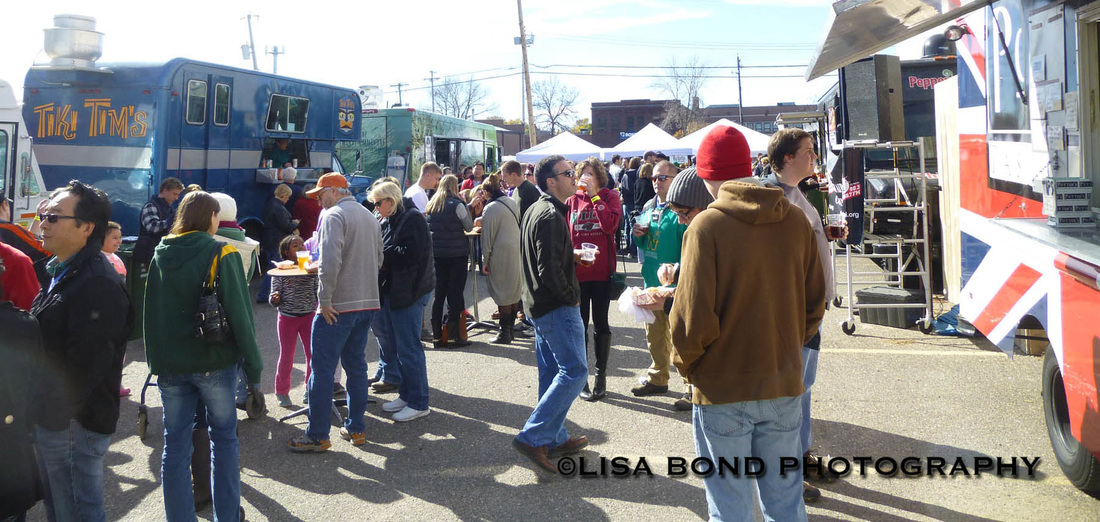


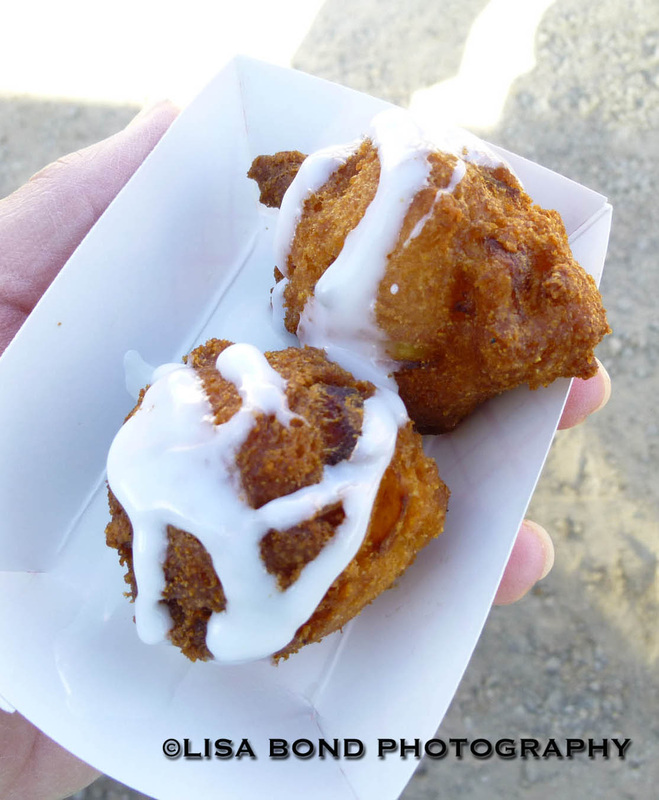
The approach I took was to survey first, review their menus, then go back to whatever I had to try. Well, that was the plan anyway. Until I got to this truck, offering a Mango Fritter for $2. That was how it began. We had dessert first. 
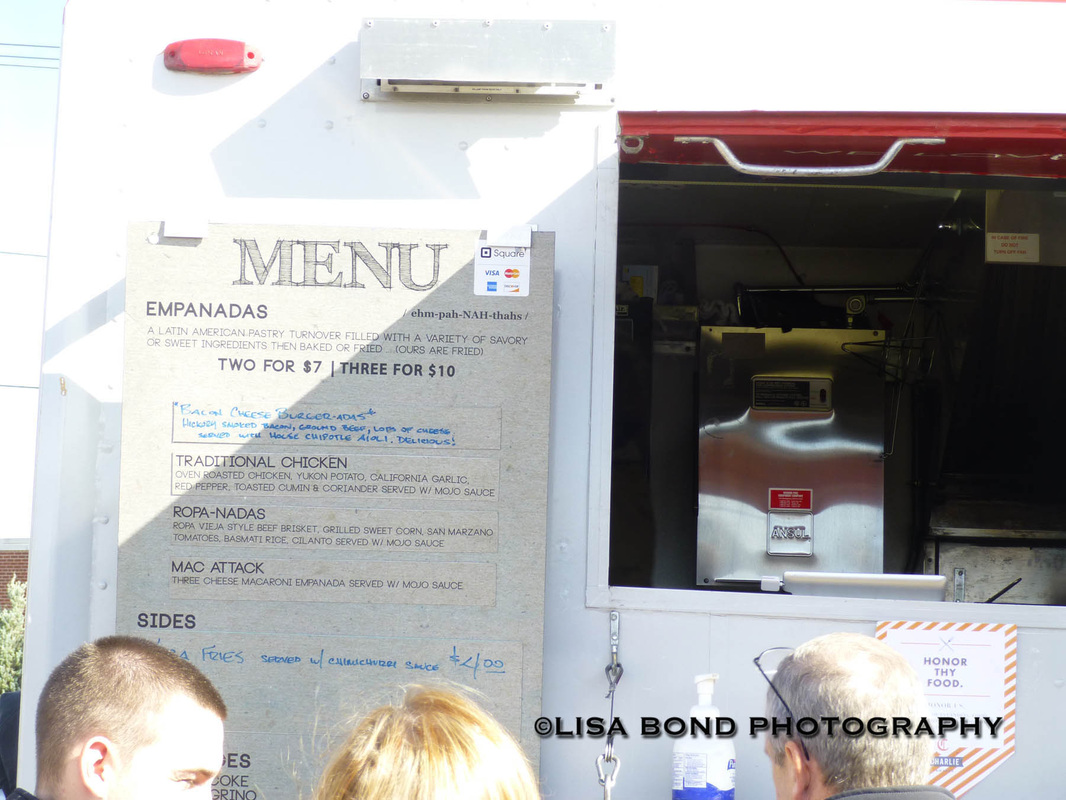
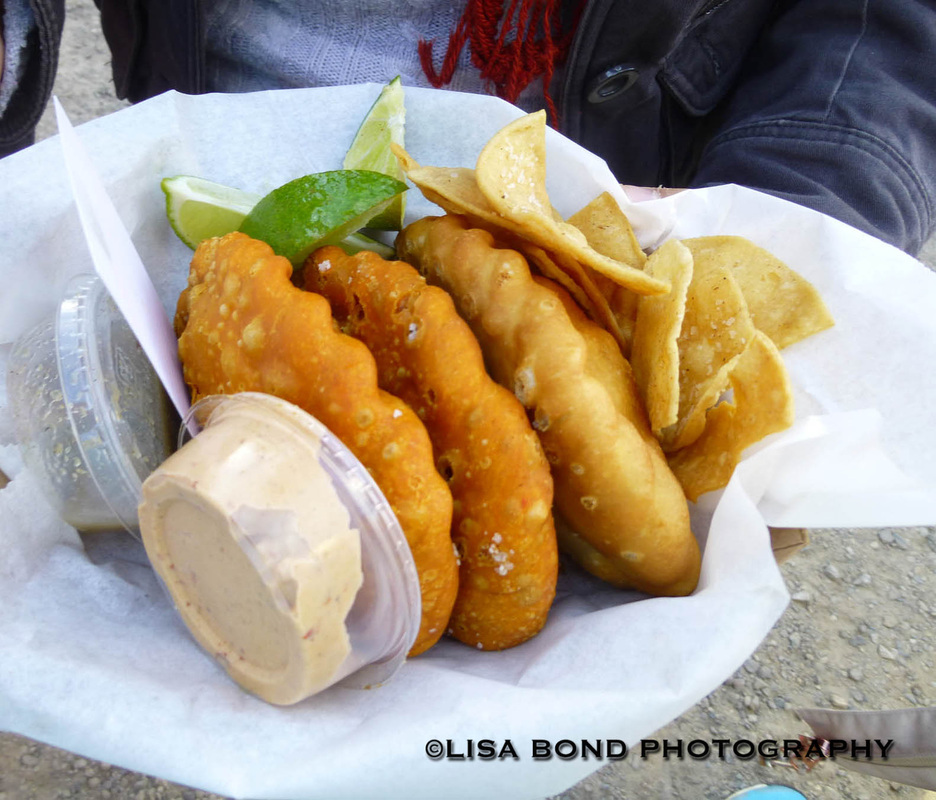
Next was my daughter's pick, the Empanada truck. They had food that sounded safe for her (aka not spicy) to try: the Mac-N-Cheese and the Cheeseburger Empanadas. They were good, but pretty bland for my taste. 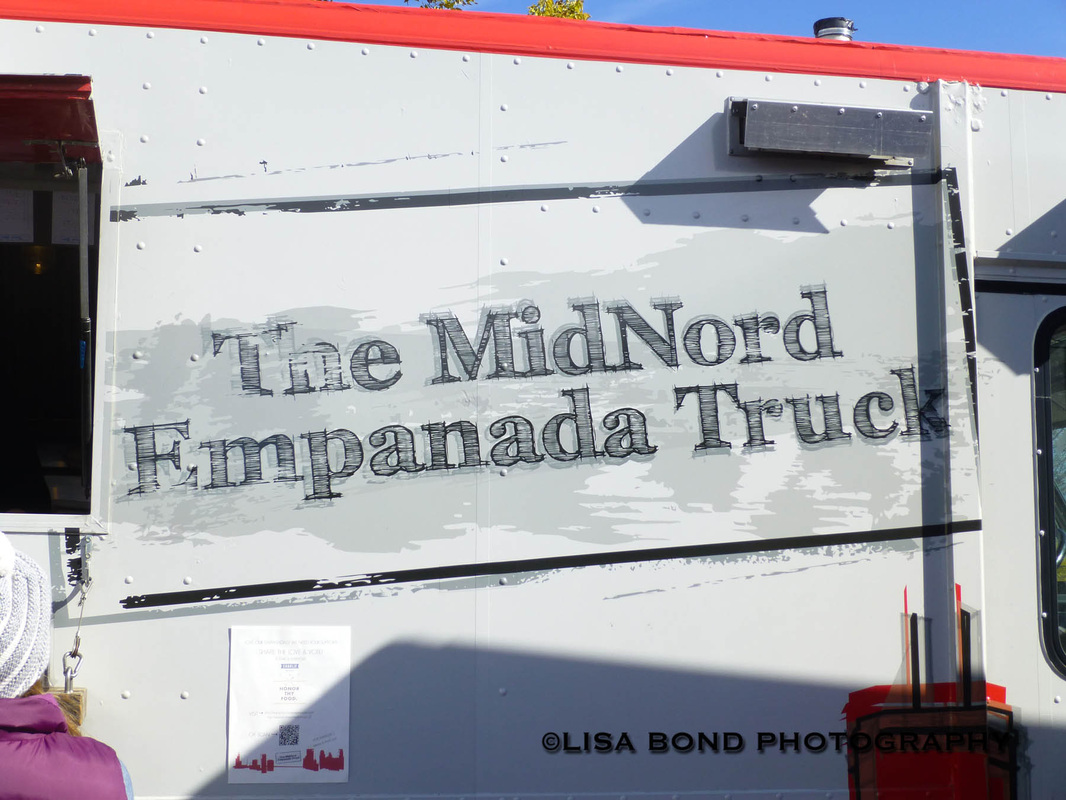

The place I wanted to go back was to Andrew Zimmern's truck for the smashed potato running at $3. A lot of these trucks will set you back $9 or $10, but I wanted to sample a few different things. I was looking for some smaller portions so I wouldn't get filled up on one dish. 
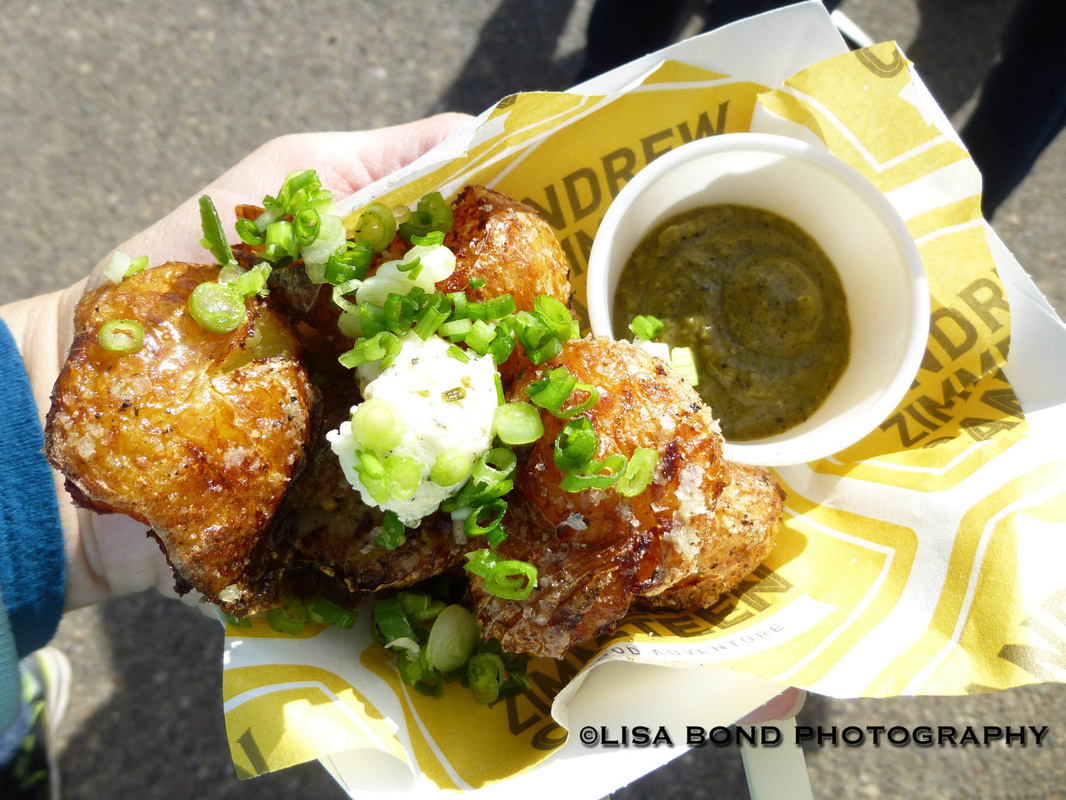
I could tell by their appearance these were gonna be good. In fact, I am pretty sure they were the most amazing potatoes I've ever had in my life. They were creamy inside, crunchy skins, salty, garlicky, OMG can-I-get-another-order-of-these good. I thought about going back, but I wanted to have room to try something else. What I decided on was the Moral Omnivore truck. Their menu had some very interesting things on it. 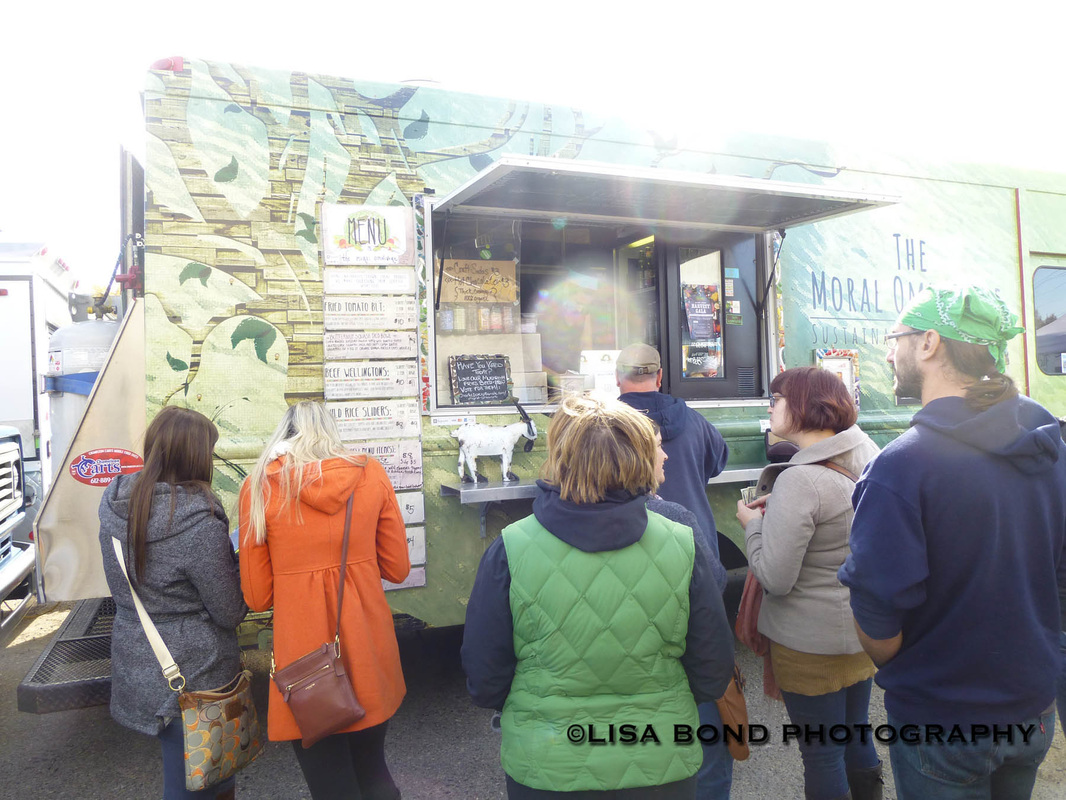
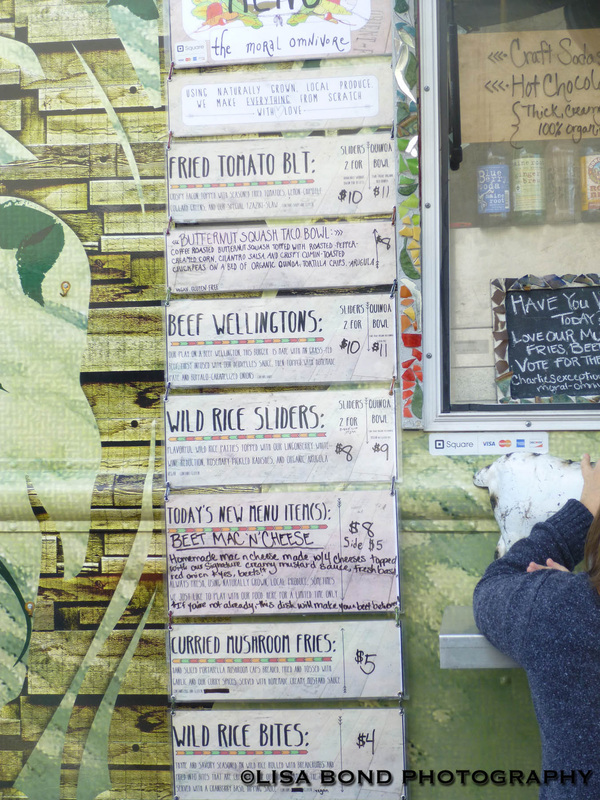
I decided to go with the Curried Mushroom Fries since they won an award for something and I love anything with curry in it. 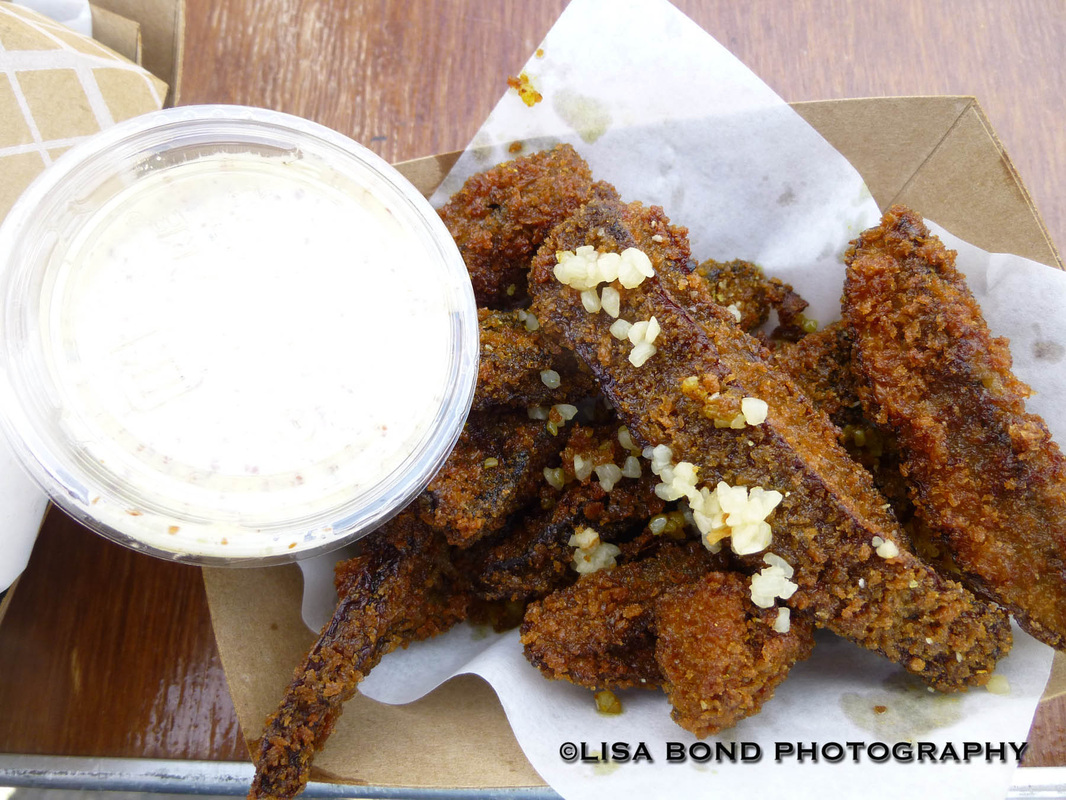
They were good and unique. Very fried and very mushroomy. I don't know if I'd buy them again, but if someone else did, I would probably sneak one or two of theirs. I also decided to get the Beet Mac-n-cheese to bring home for one of my other kids who happens to like beets. I sampled a few bites of it after they were done (they didn't eat it all). It was very interesting and good. The red onions were a bit overpowering. I liked the crunch they offered but I would have opted for a milder, maybe a green onion so it didn't become the dominant flavor. 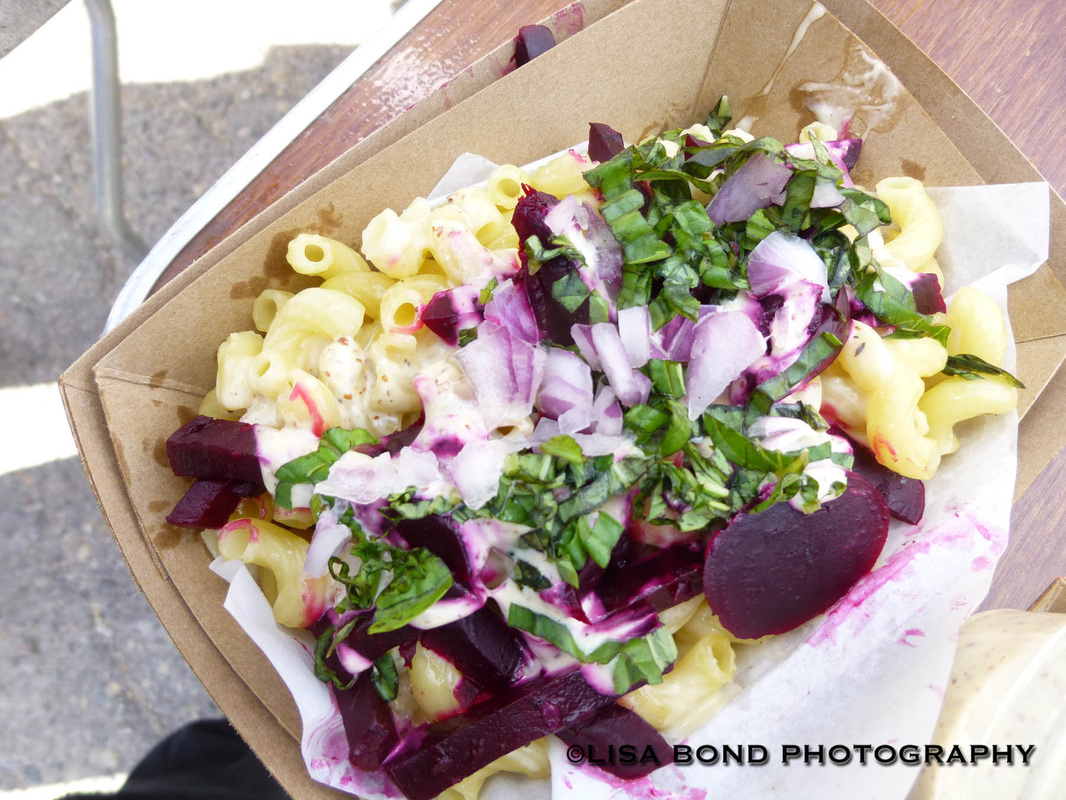
What happened next can best be described as a post-Thanksgiving-dinner-like induced coma. I felt intoxicated from eating too much and there was only going to be one cure: sleep. I do not know how people sat in a beer tent and drank after, before or during that event, but they did. Maybe it's a timing thing that I haven't yet figured out. Something like: beer, food, break, beer, food, beer, food, sleep. Too bad I live so far away and had to drive. For those who live in the area and had the afternoon/evening off and could walk, it was a great plan for the day.
In the end, there was one thing I couldn't forget. Those potatoes. In fact, I might have to track down that food truck one more time before the snow starts flying. In the meantime, thanks for stopping by and I hope you have the pleasure to try a food truck someday. Well, at least it was a "second" helping for us. We didn't have the heart to stop the little guy. 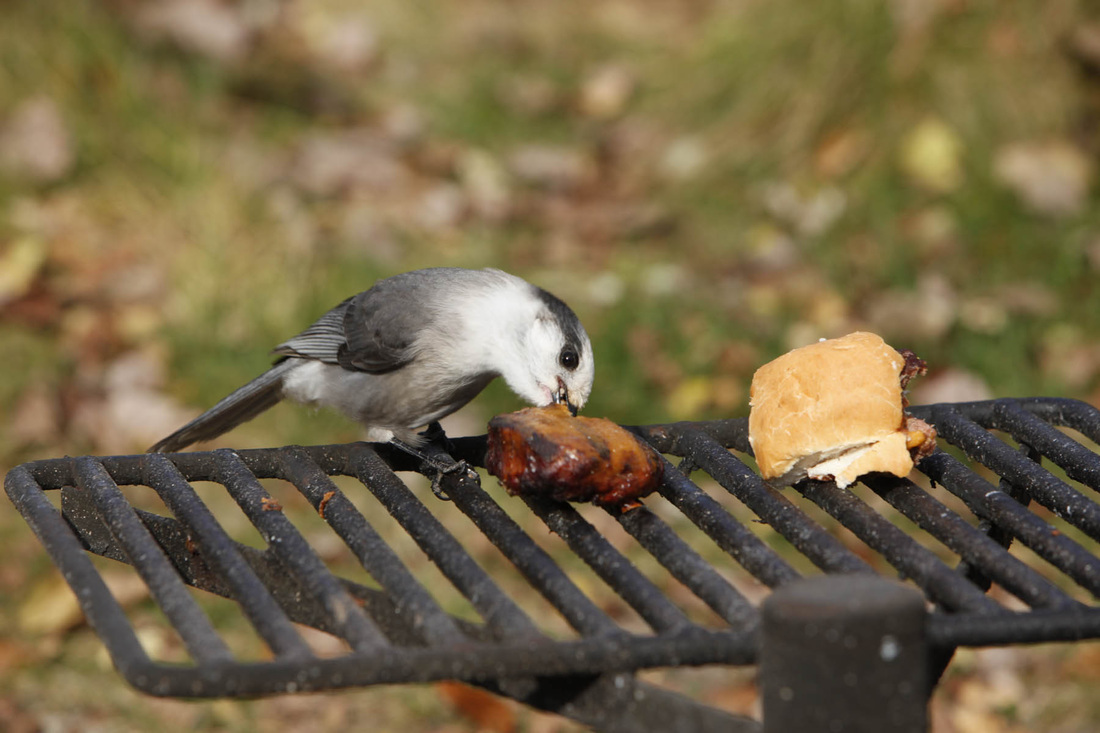 ©2014 Lisa Bond Photography In case someone is wondering, the grill wasn't hot anymore, but how does the bird know without first giving her a try?
It's birthday time over here and that means it is also cake making time. I am one of those people who prefer to make cakes at home. One reason for that is I have a kid with peanut and nut allergies, and that is the only way I can be certain about ingredients and control any cross-contamination issues. Secondly, I've never cared for the "crisco" types of frostings that come out of a lot of bakeries. You know the kind where it sticks to the roof of your mouth and it has a greasy feeling like it will be around for awhile. The frostings I make at home have butter, and cream cheese, and vanilla and powdered sugar so they taste better and when you swallow them that's the end of the story, except for the calorie counting part of it. I thought someone out there would enjoy watching this Gummy Bear Pool Party Cake being made. I actually made this same cake last year. My daughter and her birthday-mate/BFF asked for it after looking at pictures of last year's cake, but I was secretly hoping I could mix it up a little. I decided I would make a Gummy Bear Ocean Beachfront Party Cake and surprise them. It was going to have a sailboat with gummy bears in it, and gummy bears on beach chairs and gummy sharks and umbrellas. There were going to be waves and the sail was going to announce the birthday girls' names and birth date. I made the cakes in advance and I will admit that while I detest most bakery and store-bought frostings, I have made plenty of made-from-scratch cakes and in my opinion, the box cake mixes from the stores are just as good if not better than home cake mixes. Not true for frosting, but very true for cake mixes. For this party, I decided to make two boxes of cake mix, to be sure I have enough cake. So I made two 9x12 pans of chocolate cake, then sliced them both in half (horizontally) and frosted each layer, so that when they were put back together, the order went like this: cake, frosting, cake, frosting, cake, frosting, cake.  ©2014 Lisa Bond Photography I decided to color the frosting with food coloring to make it more fun. It's not flavored, just colored. Then put the whole thing back together, cover it with wrap, and pop it in the fridge the night before. That way, the only thing I have to do on the day of the party is decorate the outside of the cake. If it was an early party, it could be done the night before, but this party was in the late afternoon so I knew I would have time in the morning.  ©2014 Lisa Bond Photography Before this goes any further, it is important to get the cake on the plate that it is going to be served on. It is best to avoid moving the cake once the final decorating begins. In this case, I am using a sturdy piece of cardboard that I got at the baking store. They also sell nice sheets of foil, but I'm just going to use regular aluminum foil for this cake.  ©2014 Lisa Bond Photography I'm going to cover it with plastic wrap and then aluminum foil, so I can use it again by disposing of the foil and wrap after the party. 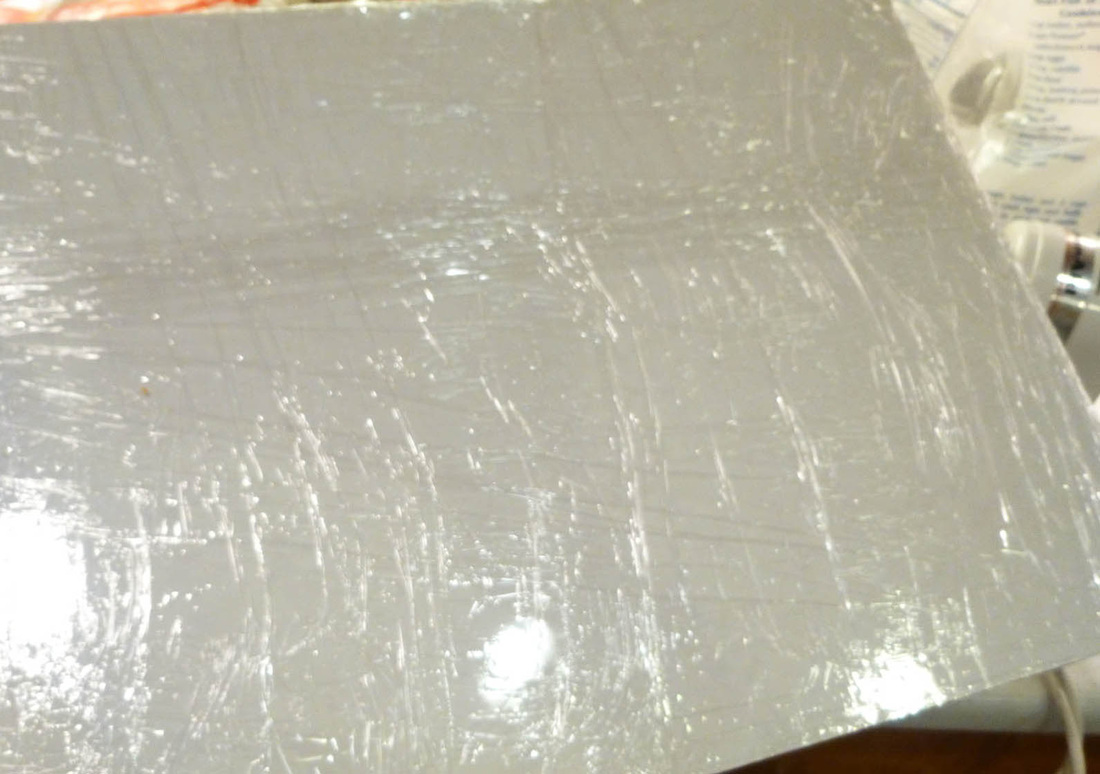 ©2014 Lisa Bond Photography 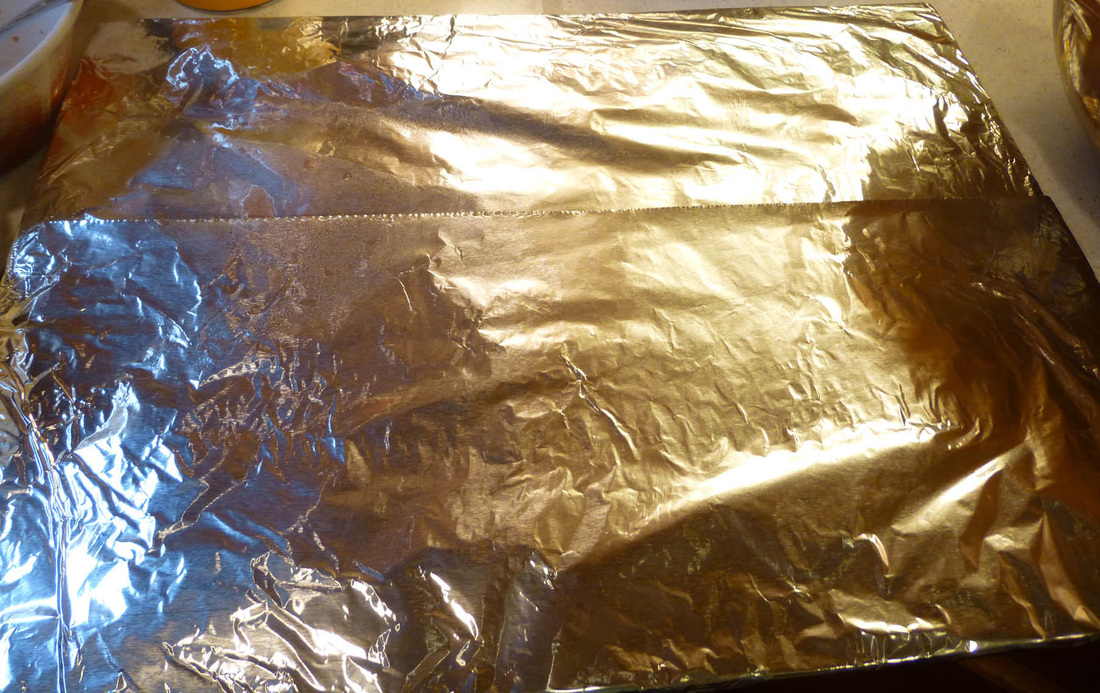 ©2014 Lisa Bond Photography Tape the wrap/foil down in back so the cake and foil don't move when they get transported.  ©2014 Lisa Bond Photography I'm going to use the bottom from a "perfect brownie" pan to move the cake. The bottom from a spring form pan would also work for this task. Using a transfer board will help to ensure that the cake doesn't crack or break when it gets moved.  ©2014 Lisa Bond Photography The next thing to do is put strips of parchment or wax paper along each edge of the bottom of the cake. This will help with keeping the base around the cake clean. It will save a lot of clean-up time at the end. Remember, these have to be pulled out when everything is finished, so don't put them too far under the edge. Put them just far enough in so that they won't slide out when the cake is being worked on. 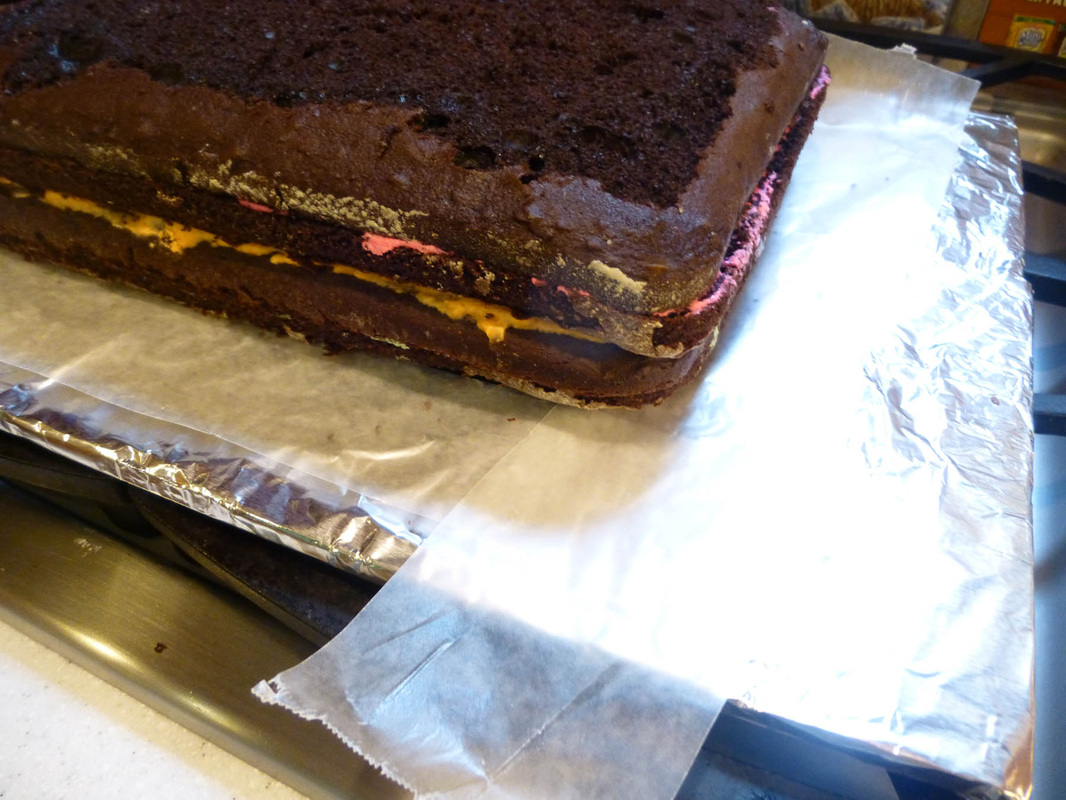 ©2014 Lisa Bond Photography I had to slice off the top of the cake to make it level. A more professional baker would have produced a level cake, but I'm not there yet, so just take a serrated knife and slice off the top so the cake is flat. The next thing I'm going to make is sand for the beach. I decided at the store that these vanilla sandwich cookies look about the color of sand. So I scraped out all the middles and ground them in the food processor.  ©2014 Lisa Bond Photography 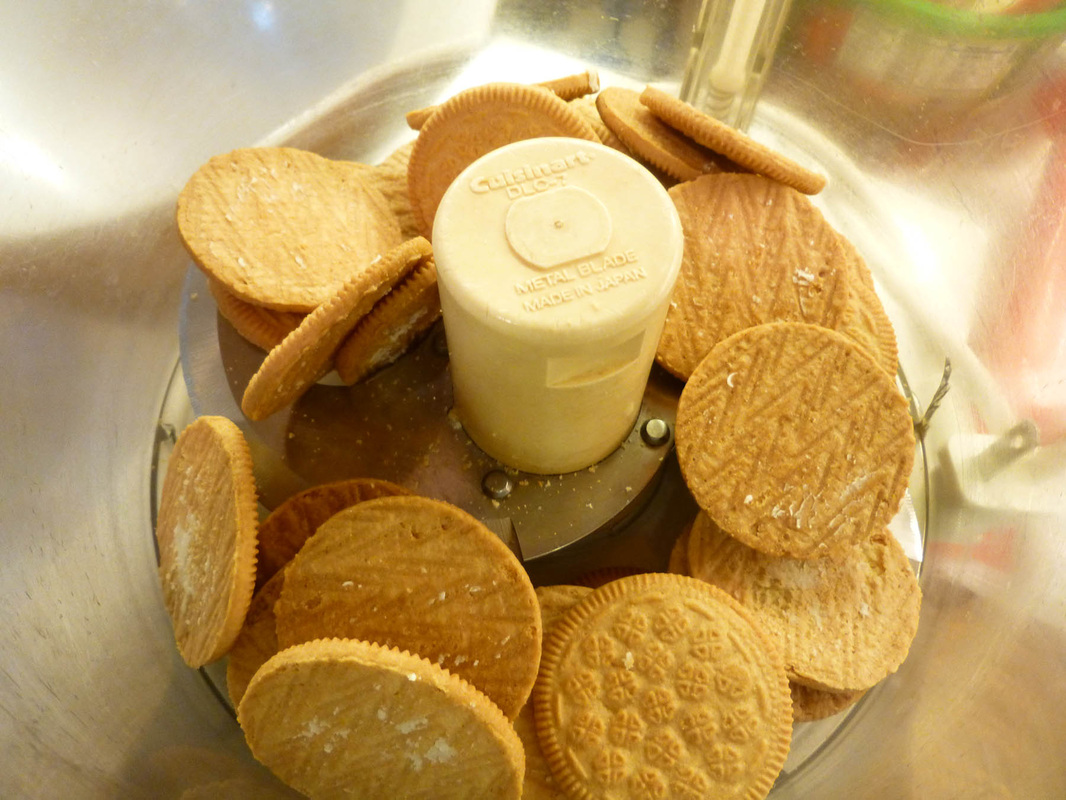 ©2014 Lisa Bond Photography 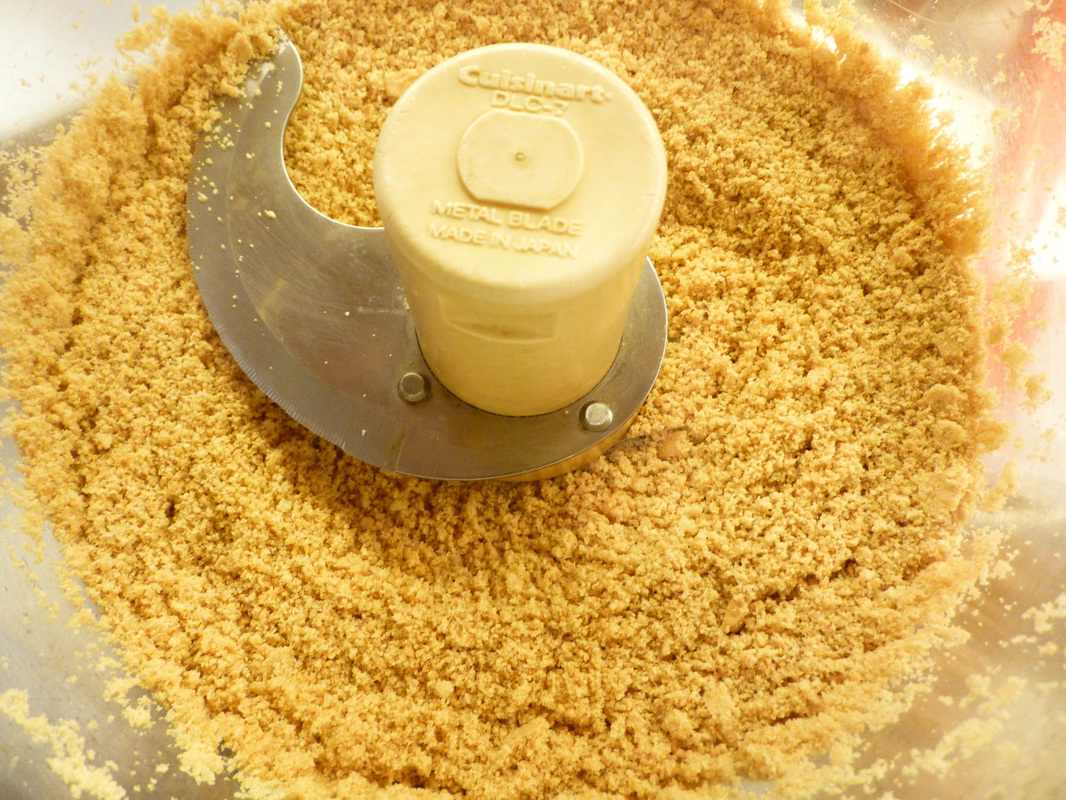 ©2014 Lisa Bond Photography I think that definitely looks like sand! 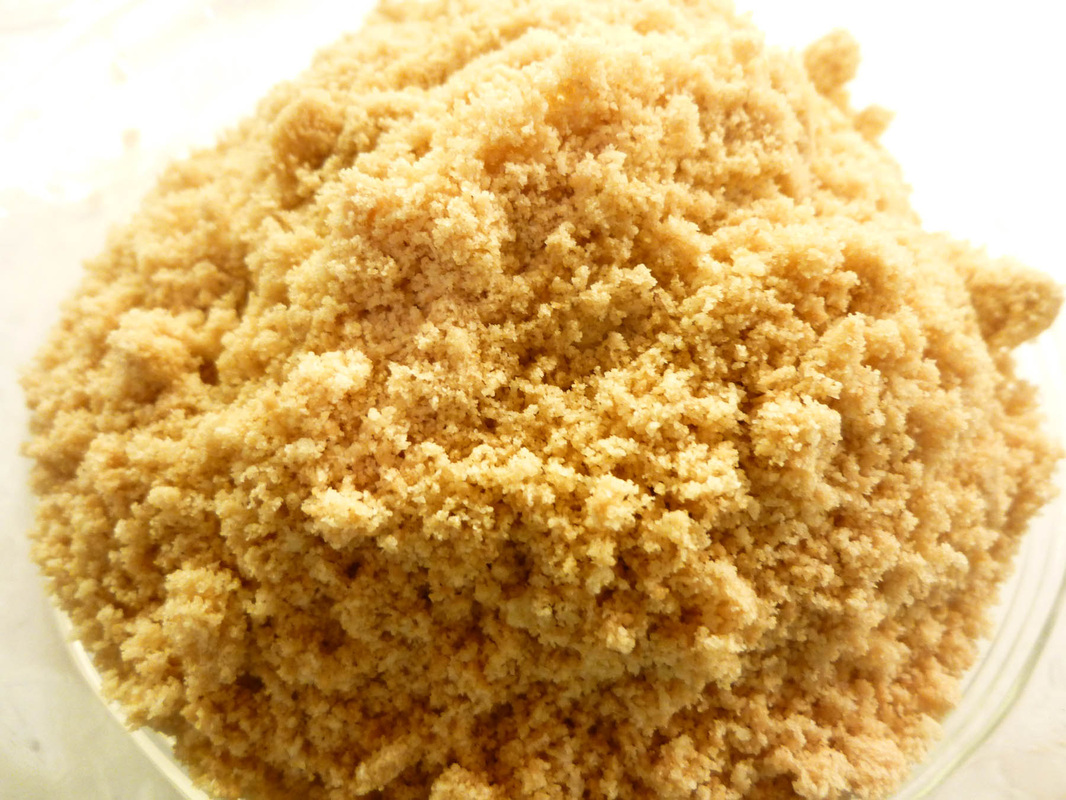 ©2014 Lisa Bond Photography This is when my daughter walked in the kitchen. I thought I should at least mention that there was going to be a surprise element about the cake to see how it was going to go over. She had a total meltdown. Mission aborted. Back to the pool party cake. At least I know how to make sand for cake if I need it again. Good thing I asked. Kids these days! Moving on to the frosting. I made a big batch of it so I'm sure to have enough. It's a stiff frosting so it will hold up well for decorating or piping. 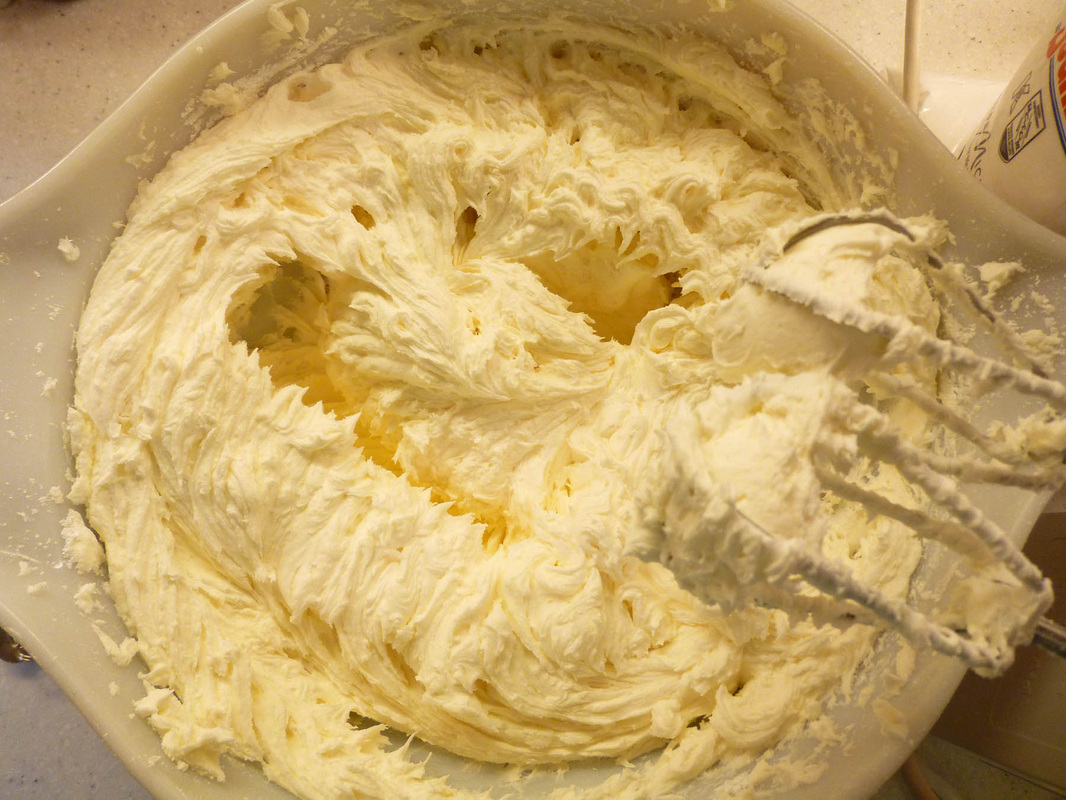 ©2014 Lisa Bond Photography The first thing to do is get on the crumb coat. It is important to "glue" down all those crumbs so they aren't getting in the finished decorations. A real pro's crumb coat wouldn't show any crumbs, but mine does. I'm not worried about it because they will be covered up with the next layer of frosting. Here's an important tip: Separate out some frosting for the crumb coat in a different bowl and keep the knife out of the "master" bowl of frosting. Otherwise crumbs will get in the main bowl and then it will basically be a disaster. Don't double-dip the knife. If more frosting is needed for the crumb coat, use a spoon to get it out of the master bowl. Once the crumb coat is done, get rid of the bowl and spoon that was used to do it. Use a new knife for the next layer of frosting. 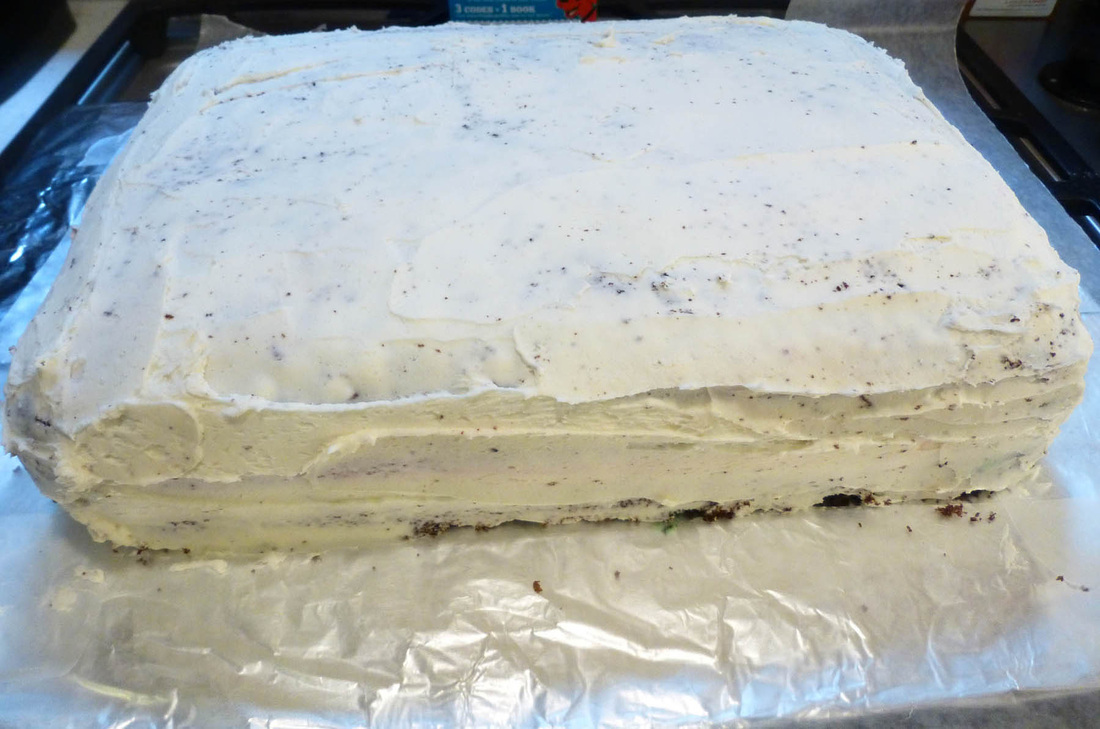 ©2014 Lisa Bond Photography If different colors of frosting will be needed, take an amount of frosting that looks right and put it in a separate bowl. Color it with food coloring and stir it up. If more is needed, add appropriately and color again. I decided to make the sides green and the edge of the pool white, so I'm going to get that coat on first. 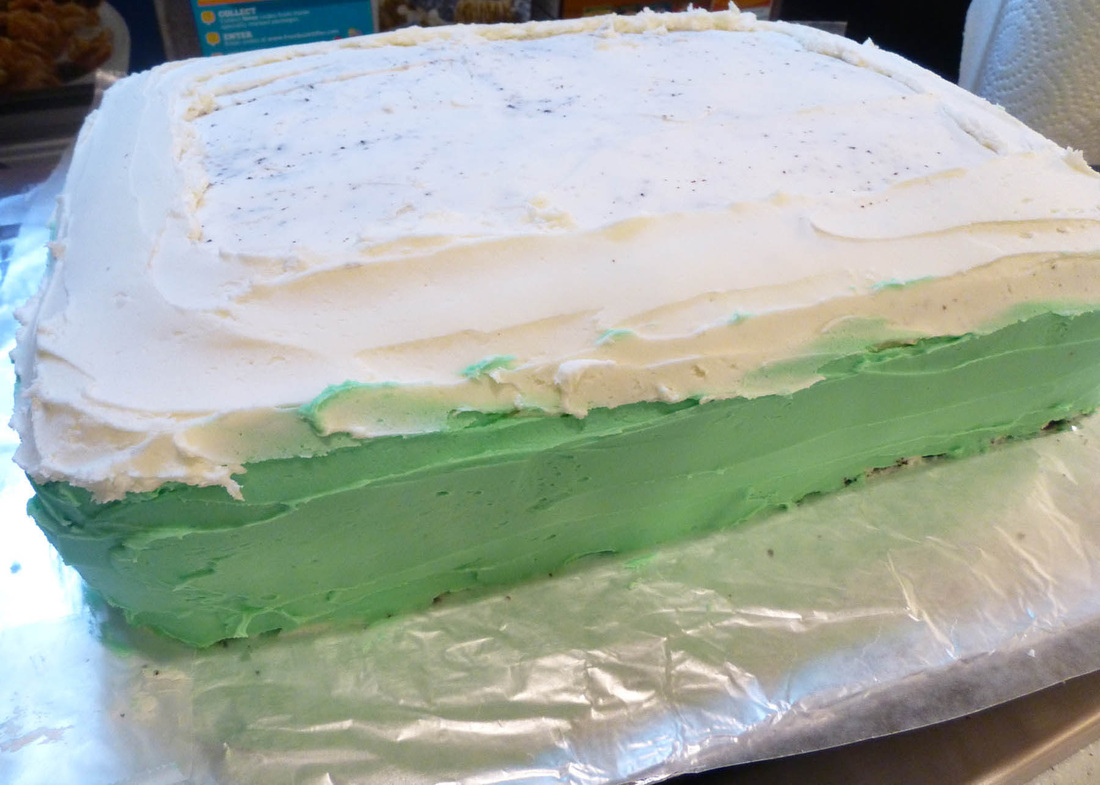 ©2014 Lisa Bond Photography If an error is made like this one, simply use a toothpick to pick out the green frosting and then clean it up with white frosting. While the frosting is still "wet", it is important to apply anything that needs to stick to it. I decided to use some different candy to decorate the sides, in this case, Spree, Gummy Bears, and Dots.  ©2014 Lisa Bond Photography Next it was time to lay down the pool. 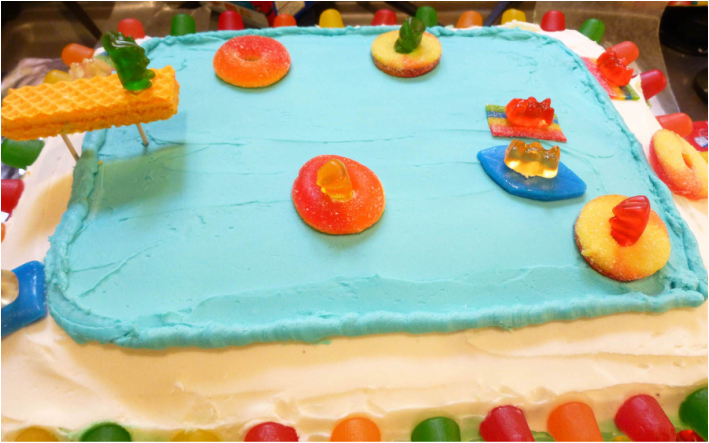 ©2014 Lisa Bond Photography Oops, I must have gotten carried away and forgot to photograph it. Well, here it is and I also piped an edge around the pool to give it a more finished appearance. I could have done a better job but there was a lot going on in the background at that point. The gummy bears are floating in peach gummy rings, and the pool mats/surfboards are made out of Airheads and some kind of sour gummy tape. I used a clean scissors to cut whatever shapes I needed. The diving board is a wafer cookie held up by tooth picks. Gummy bears were "glued" in place using a tiny dab of frosting. 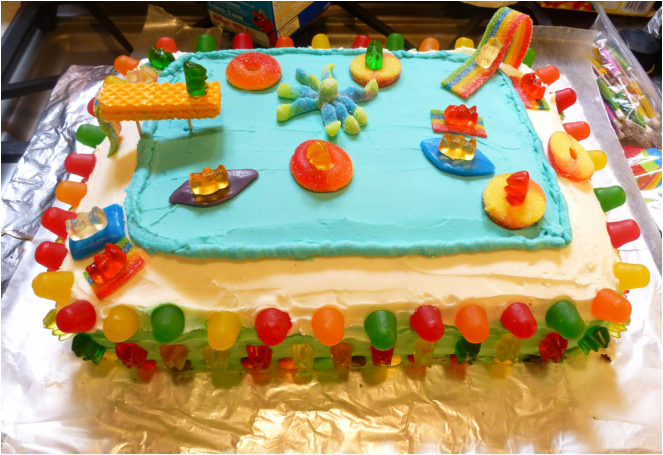 ©2014 Lisa Bond Photography A few more decorations and some gummy bears sunning around the sides of the pool brings this cake close to completion. The octopus was for the beach cake but I thought the kids would think it was fun if there was an octopus in the pool. Guess which piece of candy all the kids wanted from the cake? The octopus. The "slide" was made out of some very flexible sour gummy tape. I used a toothpick at first, but it was too short so I broke off a wooden skewer and used it to hold up the slide. 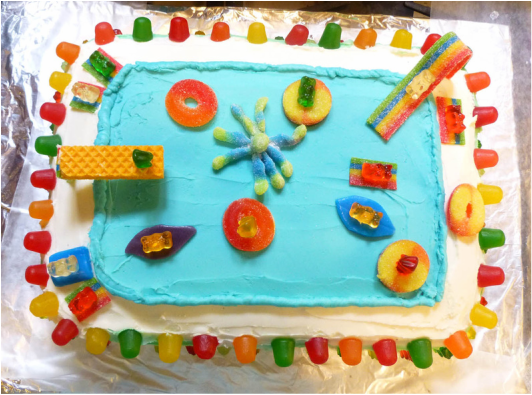 ©2014 Lisa Bond Photography Now it's time to get those parchment/wax paper strips out. Go slow and easy. Repair frosting if needed. I've tried to save myself the step of the parchment paper and I always regret it. It will be more work to clean-up and repair if they aren't used in the first place. The prevention rule applies here. 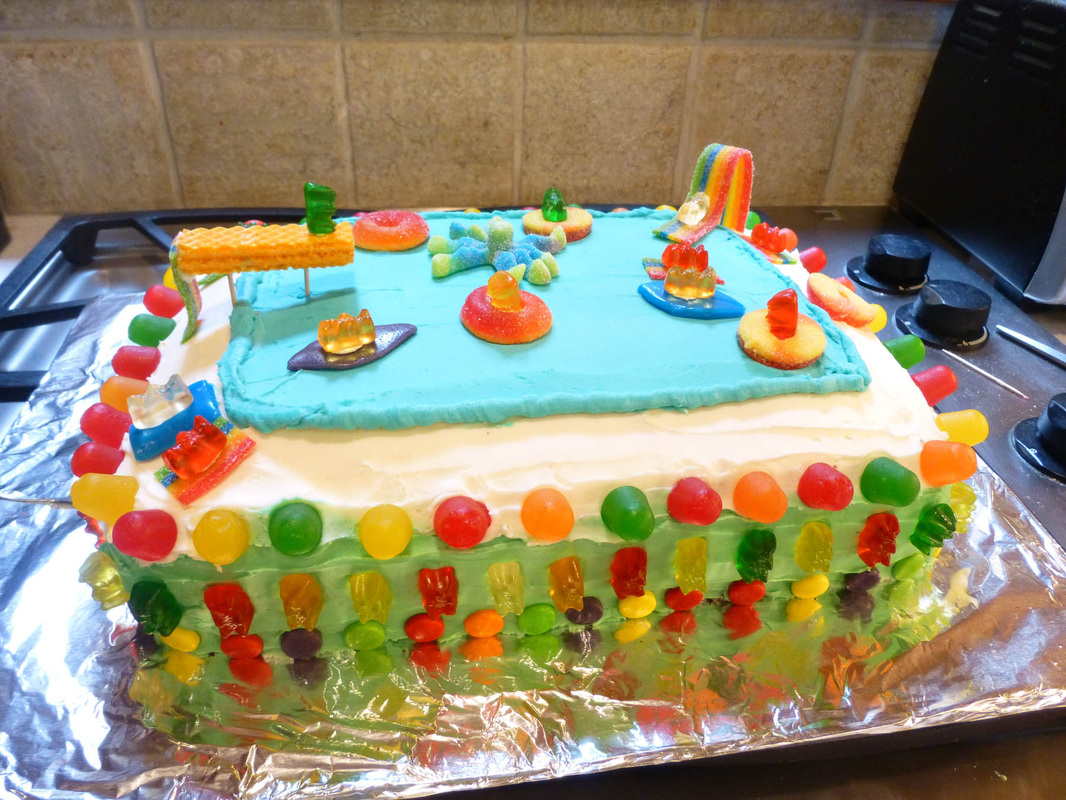 ©2014 Lisa Bond Photography There's just one more thing. I have some cocktail umbrellas that I'm going to put around the pool, but I want to wait until I get to the party. Very lightly drape the cake with saran wrap to protect it while it is transported to the party. Amazingly, this cake held up well and not a single piece of candy fell off the cake during the 30 minute highway commute. I was so relieved. Still, it is best to come prepared and bring extra frosting, a knife, and toothpicks to take care of anything that might happen on the way. Here is the cake before the candles were blown out. 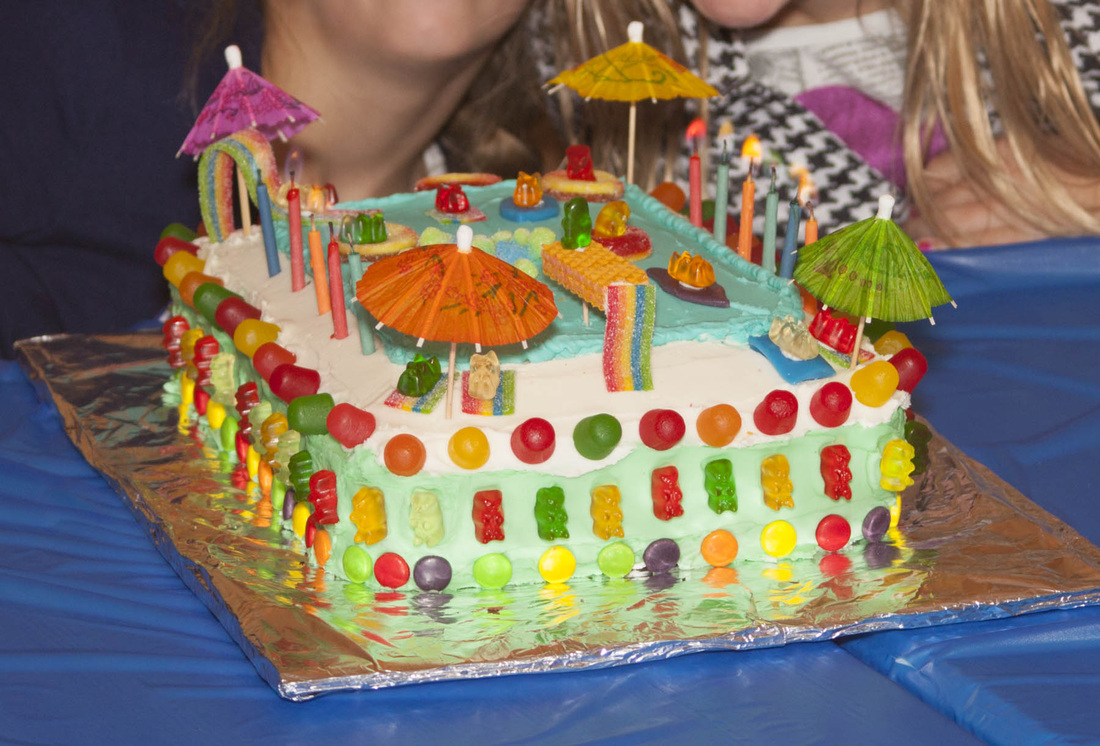 ©2014 Lisa Bond Photography Oh yes, there is one more thing. The other birthday girl requested gummy bears to be getting married. The best way I could accommodate her was to have them on their own wedding cake. I made some tiny cakes using a little batter from the other cakes, but baking them in small ramekins. The bride and groom were bigger gummy bears I found at the market. The groom is colored with black Sharpie and the bride's gown was made out of Kleenex and her veil was super-glued to her head (her waist band (dental floss) got a little hiked up, although it looks like she is being held hostage, it was supposed to be around her waist...I tried to lower it but I couldn't get it down with my fingers once we were on location. I should have used a toothpick!). I stuck toothpicks in the bottom of them and then poked them in the cake when we got there. The bears themselves weren't edible in the end, but the cake was and these girls are at the age where they loved the idea of a wedding cake! 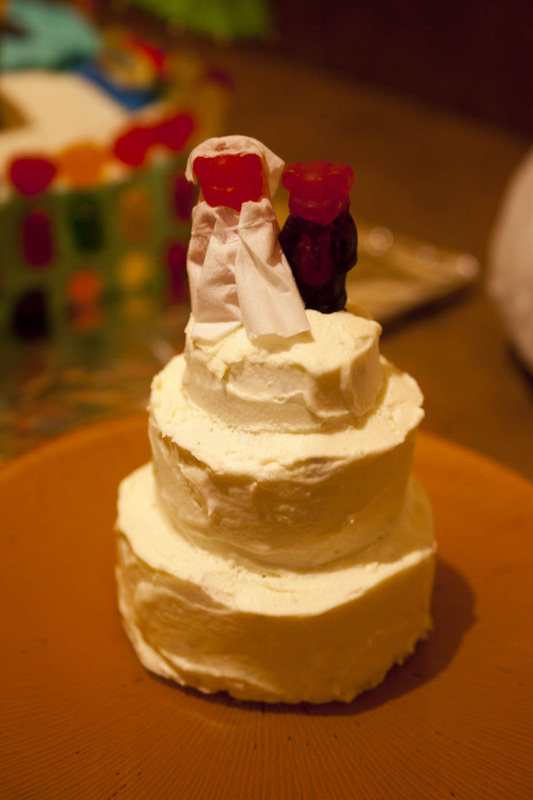 ©2014 Lisa Bond Photography I hope you enjoyed this post and that you will visit again. Thank you for stopping by!
Justin Hayward is the celebrated singer-songwriter from The Moody Blues. At some point, he became the frontman for the band, despite being a latecomer to an already existing group, probably because he is the main singer and lead guitar player. Or maybe it could be chalked up to his insightful and philosophically introspective reflections of life and love. Maybe it was his melodic voice or skillful guitar playing. Or maybe it was the long list of songs he has written over the years, this compilation credited to The Moody Blues' website: "Justin’s much-respected and comprehensive songwriting and recording career can be listed under various categories, as follows: A lot of those songs were written when he was in his late teens and early 20s, making this list even more amazing. The discography is long and one can argue many songs would be the one to pick as his #1 Best. A very strong candidate must surely be "Question". Written in April of 1970 when Justin was 24 years old, it hits all the notes musically, philosophically, in its complex arrangement, and melodically. Here is a wonderful video from the 1970s, most likely one of the early performances of it: Here is another great rendition, this time Justin is performing an acoustic version of it by himself. Note how well he carries this on his own. Never mind the complacent crowd, at least they seem to be somewhat roused by the end. I wonder if some of them wanted to dance but felt they should just go along with the crowd and stayed seated. And lastly, I sadly missed the Moody's performance in late August here in Minnesota. They played at the newly remodeled Northrup Auditorium but tickets were priced especially high and it just wasn't in the cards for me right now. Fortunately, someone videotaped it for our viewing pleasure and here is a brand spanking new version of it. I have a feeling I will be talking about The Moody Blues or Justin Hayward again in the future. I am a renewed-old fan of theirs, it actually all started about 25 years ago and involved a box of Suddenly Salad, shrimp impostors, a Magritte poster ("Golconda"), In Search Of The Lost Chord, and my friends Jes and Martha, so thanks a lot Jes, this is all your doing. Actually, I really mean that, thanks Jes and thanks to The Moody Blues for reminding us still, after all these years, to think a little deeper and for raising more questions than answers.
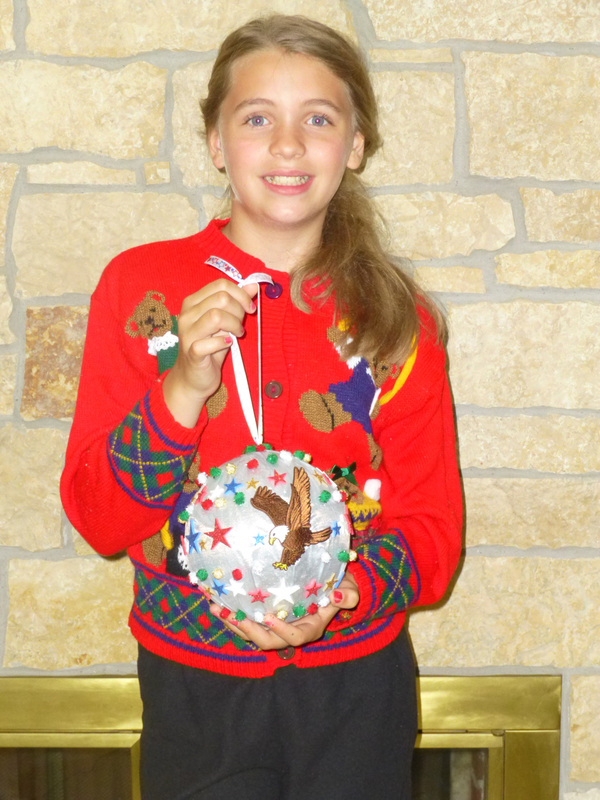
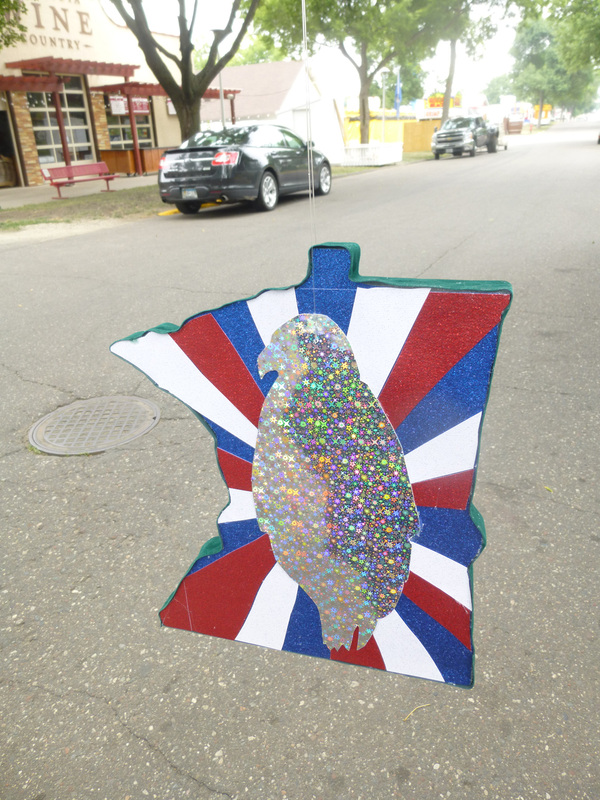
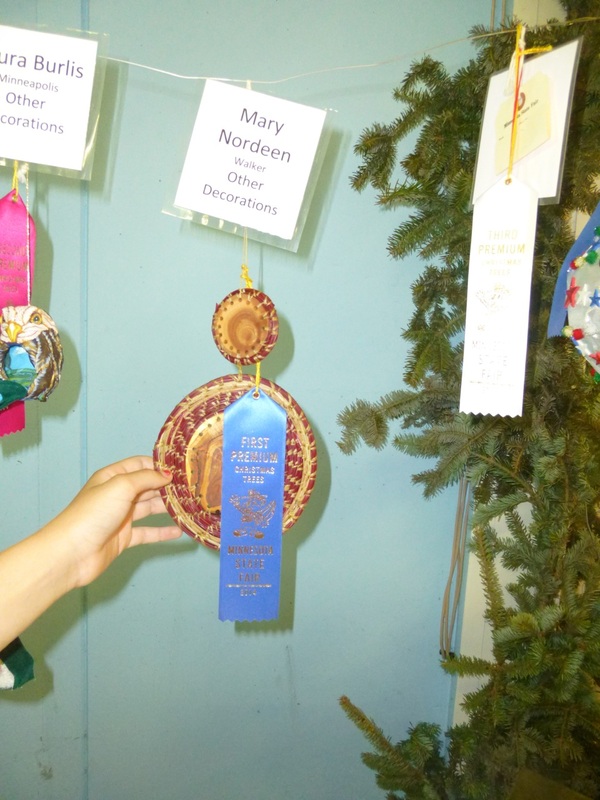
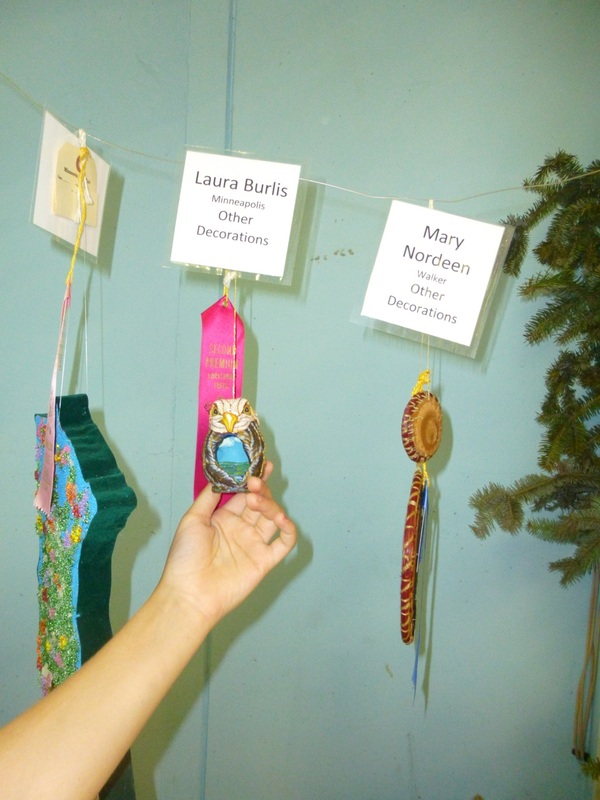
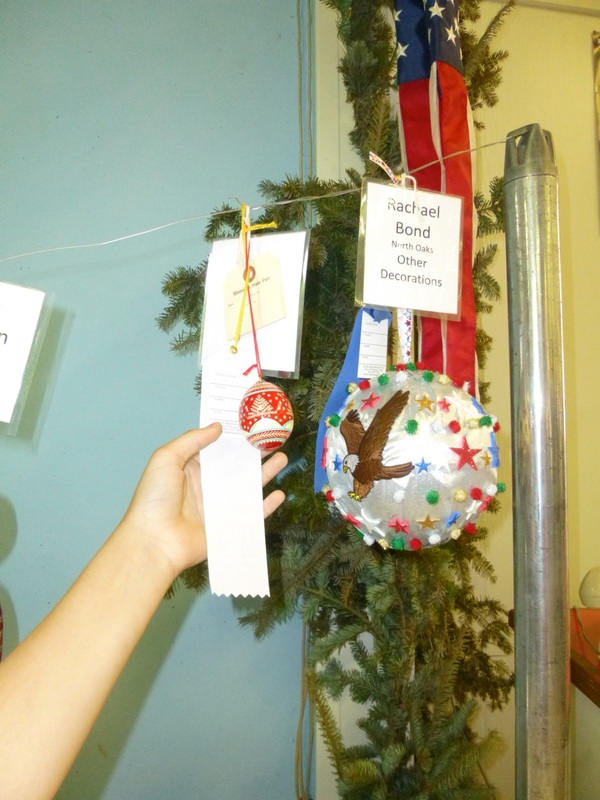
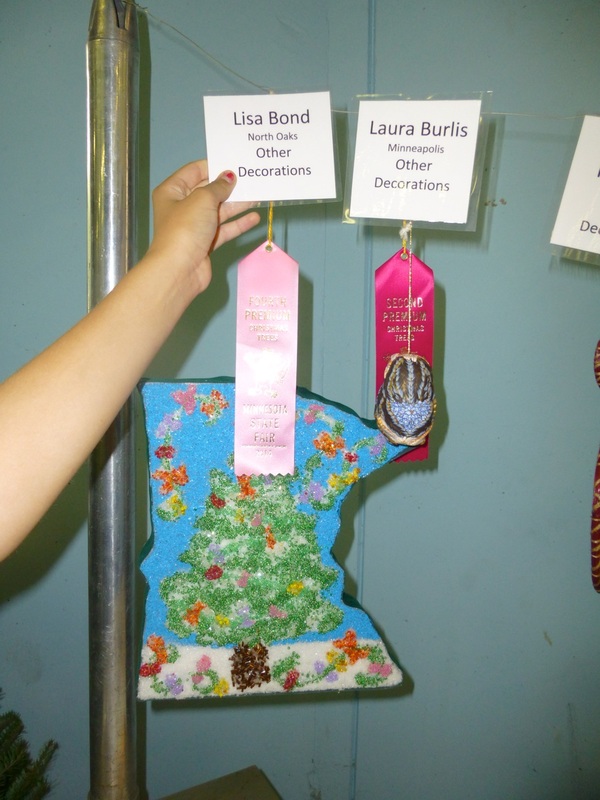
Until next time, and I do hope they become more frequent, thanks for stopping by and I hope you are enjoying the beginning of the change to the fabulous colors of fall. Excitement is building in Minnesota this year as the U.S. Capitol Christmas tree will be coming from the Chippewa National Forest, located right here in our great state. The tree has been chosen and it is 65 feet tall. Along with the tree, our state will be donating 10,000 ornaments to help decorate it. There are several contests running to encourage artists and citizens to create works of art to send along the way, and one of those is taking place at our wonderful State Fair. The contest has some criteria to meet including the ornament has to be less than 12 inches tall, it must be 2 or 3 dimensional, and it has to weigh less than 1/2 pound. It also has to include one of the following features from the state park logo: an eagle, Ojibwe floral bead work design, spruce or balsam fir tree, and/or elements of nature found in Minnesota such as lakes, rivers, or ecosystem. I was able to convince my youngest daughter to design an ornament. I also decided to do it with her since they had an adult as well as a youth category. The prizes were substantial. First place was awarded $100, 2nd $50 and 3rd $25. Those are big prizes for the State Fair. Most creative or educational ribbons only award $8 for first place so this was definitely worth putting some serious effort into. Here is what we created. My daughter's is first (she wanted to wear her Christmas sweater for the photo). Mine is second. My daughter turned out to be the proud 1st place ribbon holder at our State Fair, and she already got her $100 check in the mail. We have the option to donate the ornaments to the tree after the fair and we both decided we would send them along to Washington, D.C. We are hoping to see a presidential portrait that might happen to have our ornaments in the background. That would be pretty neat! Update: We made it to the display at the fair last week. Here are photos of the winners. I was surprised to see that I got a 4th place ribbon, since only the first 3 ribbon holders were published on the State Fair website, so I thought I hadn't received anything for my piece. It is my first ribbon at the Fair and I am very proud of it! |
AuthorI am a photographer who lives in Minnesota. I blog about Minnesota, photography, music, food and miscellaneous topics. Archives
November 2016
Categor
All
|


 RSS Feed